Chapter 6: Physics Libraries
A library implies an act of faith
Which generations still in darkness hid
Sign in their night, in witness of the dawn.
—Victor Hugo


In the Indian state of Meghalaya, the Khasi and Jaiñtia peoples live in areas that experience some of the highest rainfall in the world. During the monsoon season, floods often make traveling between villages impossible. As a result, the ancient tradition of constructing living root bridges emerged. These bridges, like the double living root bridge in East Khasi shown here, are created by guiding and growing tree roots through bamboo, palm trunks, or steel scaffolding. They grow and become stronger as the roots interact with the environment, forming adaptive, springlike connections.
Think about what you’ve accomplished so far in this book. You’ve done the following:
- Learned about concepts from the world of physics (What is a vector? What is a force? What is a wave?)
- Understood the math and algorithms behind those concepts
- Implemented those algorithms in p5.js with an object-oriented approach, culminating in building simulations of autonomous steering agents
These activities have yielded a set of motion simulations, allowing you to creatively define the physics of the worlds you build (whether realistic or fantastical). But, of course, you and I aren’t the first or only people to do this. The world of computer graphics and programming is full of prewritten code libraries dedicated to physics simulations.
Just try searching open source physics engine and you could spend the rest of your day poring over a host of rich and complex codebases. This begs the question: If an existing code library takes care of physics simulation, why should you bother learning how to write any of the algorithms yourself? Here’s where the philosophy behind this book comes into play. While many libraries provide out-of-the-box physics to experiment with (super-awesome, sophisticated, and robust physics at that), there are several good reasons for learning the fundamentals from scratch before diving into such libraries.
First, without an understanding of vectors, forces, and trigonometry, it’s easy to get lost just reading the documentation of a library, let alone using it. Second, even though a library may take care of the math behind the scenes, it won’t necessarily simplify your code. A great deal of overhead may be required in understanding how a library works and what it expects from you code-wise. Finally, as wonderful as a physics engine might be, if you look deep down into your heart, you’ll likely see that you seek to create worlds and visualizations that stretch the limits of the imagination. A library may be great, but it provides only a limited set of features. It’s important to know when to live within those limitations in the pursuit of a creative coding project and when those limits will prove to be confining.
This chapter is dedicated to examining two open source physics libraries for JavaScript: Matter.js and Toxiclibs.js. I don’t mean to imply that these are the only libraries you should use for any and all creative coding projects that could benefit from a physics engine (see “Other Physics Libraries” for alternatives, and check the book’s website for ports of the chapter’s examples to other libraries). However, both libraries integrate nicely with p5.js and will allow me to demonstrate the fundamental concepts behind physics engines and how they relate to and build upon the material I’ve covered so far.
Ultimately, the aim of this chapter isn’t to teach you the details of a specific physics library, but to provide you with a foundation for working with any physics library. The skills you acquire here will enable you to navigate and understand documentation, opening the door for you to expand your abilities with any library you choose.
Why Use a Physics Library?
I’ve made the case for writing your own physics simulations (as you’ve learned to do in the previous chapters), but why use a physics library? After all, adding any external framework or library to a project introduces complexity and extra code. Is that additional overhead worth it? If you just want to simulate a circle falling down because of gravity, for example, do you really need to import an entire physics engine and learn its API? As the early chapters of this book hopefully demonstrated, probably not. Lots of scenarios like this are simple enough for you to get by writing the code yourself.
But consider another scenario. What if you want to have 100 circles falling? And what if they aren’t circles at all, but rather irregularly shaped polygons? And what if you want these polygons to bounce off one another in a realistic manner when they collide?
You may have noticed that while I’ve covered motion and forces in detail, I’ve so far skipped over a rather important aspect of physics simulation: collisions. Let’s pretend for a moment that you aren’t reading a chapter about physics libraries and that I’ve decided right now to explain how to handle collisions in a particle system. I’d have to cover two distinct algorithms that address these questions:
- How do I determine if two shapes are colliding (or intersecting)? This is known as collision detection.
- How do I determine the shapes’ velocities after the collision? This is known as collision resolution.
If you’re working with simple geometric shapes, question 1 isn’t too tough. In fact, perhaps you’ve encountered it before. With two circles, for instance, you know they’re intersecting if the distance between their centers is less than the sum of their radii (see Figure 6.1).


That’s easy enough, but how about calculating the circles’ velocities after the collision? This is where I’m going to stop the discussion. Why, you ask? It’s not that understanding the math behind collisions isn’t important or valuable. (In fact, I’m including additional examples on the website related to collisions without a physics library.) The reason for stopping is that life is short! (Let this also be a reason for you to consider going outside and frolicking for a bit before sitting down to write your next sketch.) You can’t expect to master every detail of physics simulation. And while you might enjoy learning about collision resolution for circles, it’s only going to make you want to work with rectangles next. And then with strangely shaped polygons. And then curved surfaces. And then swinging pendulums colliding with springy springs. And then, and then, and then . . .
Incorporating complex features like collisions into a p5.js sketch while still having time to spend with friends and family—that’s the reason for this chapter. People have spent years developing solutions to these kinds of problems, and beautiful JavaScript libraries like Matter.js and Toxiclibs.js are the fruits of those efforts. You don’t need to reinvent the proverbial wheel, at least for now.
In conclusion, if you find yourself describing an idea for a p5.js sketch and the word collisions comes up, then it’s likely time to learn to use a physics engine.
Other Physics Libraries
A multitude of other physics libraries are worth exploring alongside this chapter’s two case studies, each with unique strengths that may offer advantages in certain kinds of projects. In fact, when I first began writing this book, Matter.js didn’t exist, so the physics engine I initially used to demonstrate the examples was Box2D. It was (and likely still is) the most well-known physics engine of them all.
Box2D began as a set of physics tutorials written in C++ by Erin Catto for the Game Developers Conference in 2006. Since then, Box2D has evolved into a rich and elaborate open source physics engine. It’s been used for countless projects, most notably highly successful games such as the award-winning Crayon Physics and the runaway hit Angry Birds.
One important feature of Box2D is that it’s a true physics engine: it knows nothing about computer graphics and the world of pixels, and instead does all its measurements and calculations in real-world units like meters, kilograms, and seconds. It’s just that its “world” (a key term in Box2D) is a 2D plane with top, bottom, left, and right edges. You tell it things like “The gravity of the world is 9.81 newtons per kilogram, and a circle with a radius of 4 meters and a mass of 50 kilograms is located 10 meters above the world’s bottom.” Box2D will then tell you things like “One second later, the rectangle is at 5 meters from the bottom; two seconds later, it’s 10 meters below,” and so on.
While this provides for an amazingly accurate and robust physics engine (one that’s highly optimized and fast for C++ projects), it also necessitates lots of complicated code to translate back and forth between Box2D’s physics world and the world you want to draw—the pixel world of the graphics canvas. This creates a tremendous burden for the coder. I will, as best I can, continue to maintain a set of Box2D-compatible examples for this book (there are several JavaScript ports), but I believe the relative simplicity of working with a library like Matter.js that is native to JavaScript and uses pixels as the unit of measurement will make for a more intuitive and friendly bridge from my p5.js examples.
Another notable library is p5play, a project initiated by Paolo Pedercini and currently led by Quinton Ashley that was specifically designed for game development. It simplifies the creation of visual objects—known as sprites—and manages their interactions (namely, collisions and overlaps). As you may have guessed from the name, p5play is tailored to work seamlessly with p5.js. It uses Box2D under the hood for physics simulation.
Importing the Matter.js Library

In a moment, I’ll turn to working with Matter.js, created by Liam Brummitt in 2014. But before you can use an external JavaScript library in a p5.js project, you need to import it into your sketch. As you’re already quite aware, I’m using the official p5.js web editor for developing and sharing this book’s code examples. The easiest way to add a library is to edit the index.html file that’s part of every new p5.js sketch created in the editor.
To do that, first expand the file navigation bar on the left-hand side of the editor and select index.html, as shown in Figure 6.2.
The file includes a series of <script> tags inside the HTML tags <head> and </head>. This is how JavaScript libraries are referenced in a p5.js sketch. It’s no different from including sketch.js or particle.js in the page’s <body>, only here, instead of keeping and editing a copy of the JavaScript code, the library is referenced with a URL of a content delivery network (CDN). This is a type of server for hosting files. For JavaScript libraries that are used across hundreds of thousands of web pages accessed by millions upon millions of users, CDNs need to be pretty good at their job of serving up these libraries.


You should already see a <script> tag referencing the CDN for p5.js (it may be a later version by the time you are reading this):
<script src="https://cdnjs.cloudflare.com/ajax/libs/p5.js/1.9.0/p5.js"></script>
To use Matter.js, add another <script> tag referencing its CDN right below the one for p5:
<script src="https://cdnjs.cloudflare.com/ajax/libs/p5.js/1.9.0/p5.js"></script>
<script src="https://cdnjs.cloudflare.com/ajax/libs/matter-js/0.19.0/matter.min.js"></script>
At the time of this writing, the most recent version of Matter.js is 0.19.0, and that’s what I’ve referenced in this snippet. As Matter.js updates and new versions are released, it’s often a good idea to upgrade, but by referencing a specific version that you know works with your sketch, you don’t have to worry about new features of the library breaking your existing code.
Matter.js Overview
When you use Matter.js (or any physics engine) in p5.js, your code ends up looking a bit different. Here’s a pseudocode generalization of all the examples in Chapters 1 through 5:
setup()
- Create all the objects in the world.
draw()
- Calculate all the forces in the world.
- Apply all the forces to the objects ().
- Update the positions of all the objects based on their acceleration.
- Draw all the objects.
By contrast, here’s the pseudocode for a Matter.js example:
setup()
- Create all the objects in the world.
draw()
- Draw all the objects.
This, of course, is the allure of a physics engine. I’ve eliminated all those painful steps of figuring out how the objects are moving according to velocity and acceleration. Matter.js is going to take care of this for me!
While there will be more details to reveal, the good news is that the simplicity of this pseudocode is an accurate reflection of the overall process. In this sense, Matter.js is a bit like a magic box. In setup(), I’m going to say to Matter, “Hello there. Here are all of the things I want in my world.” Then, in draw(), I’m going to politely ask Matter, “Oh, hello again. If it’s not too much trouble, I’d like to draw all of those things in my world. Could you please tell me where they are?”
The bad news: the process is not quite as simple as the pseudocode might lead you to believe. Actually making the stuff that goes into the Matter.js world requires several steps related to building and configuring different kinds of shapes.
It’s also necessary to learn to speak the language of Matter.js in terms of how the various forces and other parameters of the world are configured. Here are the core concepts:
- Engine: The entity that manages the physics simulation itself. The engine holds on to the world of the simulation as well as various properties indicating how the world is updated over time.
- Bodies: The primary elements in the world, corresponding to the physical objects being simulated. A body has a position and a velocity. Sound familiar? It’s basically another version of the class I’ve been building throughout Chapters 1 through 5. It also has geometry to define its shape. It’s important to note that body is a generic term that physics engines use to describe a thing in the world (similarly to the term particle); it isn’t related to an anthropomorphic body.
- Composite: A container that allows for the creation of complex entities (made up of multiple bodies). The world itself is an example of a composite, and every body created has to be added to the world.
- Constraints: Act as connections between bodies.
In the coming sections, I’ll walk through each of these elements in detail, building several examples along the way. But first, there’s one other important element to briefly discuss:
- Vector: Describes an entity with magnitude and direction using x- and y-components, defining positions, velocities, and forces in a Matter.js world.
This brings us to an important crossroads. Any physics library is fundamentally built around vectors, and depending on how you spin it, that’s either a good thing or a bad thing. The good part is that you’ve just spent several chapters familiarizing yourself with what it means to describe motion and forces with vectors, so there’s nothing conceptually new for you to learn. The bad part—the part that makes a single tear fall from my eye—is that once you cross this threshold into the brave new world of physics libraries, you don’t get to use p5.Vector anymore.
It’s been great that p5.js has a built-in vector representation, but anytime you use a physics library, you’ll likely discover that it includes its own separate vector implementation, designed to be especially compatible with the rest of the library’s code. This makes sense. After all, why should Matter.js be expected to know about p5.Vectorobjects?
The upshot of all this is that while you won’t have to learn any new concepts, you do have to get used to new naming conventions and syntax. To illustrate, I’ll show you some now-familiar p5.Vector operations alongside the equivalent Matter.Vector code. First, how do you create a vector?
| p5.js | Matter.js |
|---|---|
|
|
What about adding two vectors together?
| p5.js | Matter.js |
|---|---|
|
|
That overwrites vector a with the result. Here’s how to put the result in a separate vector instead:
| p5.js | Matter.js |
|---|---|
|
|
How about if you want to scale the vector (multiply by a scalar value)?
| p5.js | Matter.js |
|---|---|
|
|
Magnitude and normalize?
| p5.js | Matter.js |
|---|---|
|
|
As you can see, the concepts are the same, but the specifics of the code are different. First, every method name is now preceded by Matter.Vector, which defines the namespace of the source code. This is common for JavaScript libraries; p5.js is unusual for not consistently using namespaces. For example, to draw a circle in p5.js, you call circle() rather than p5.circle(). The circle() function lives in the global namespace. This, in my view, is one of the features that makes p5.js special in terms of ease of use and beginner friendliness. However, it also means that for any code you write with p5.js, you can’t use circle as a variable name. Namespacing a library protects against these kinds of errors and naming conflicts, and it’s why you’ll see everything in Matter.js called with the Matter prefix.
In addition, unlike p5.js’s static and nonstatic versions of vector methods like add() and mult(), all vector methods in Matter.js are static. If you want to change a Matter.Vector while operating on it, you can add it as an optional argument: Matter.Vector.add(a, b, a) adds a and b and places the result in a (the third argument). You can also set an existing variable to the newly created vector object resulting from a calculation, as in v = Matter.Vector.mult(v, 2). However, this version still creates a new vector in memory rather than updating the old one.
I’ll cover more of the basics for working with Matter.Vector in this chapter, but for details, you can find the full documentation on the Matter.js website.
Engine
Many physics libraries include a world object to manage everything. The world is typically in charge of the coordinate space, keeping a list of all the bodies in the simulation, controlling time, and more. In Matter.js, the world is created inside an Engine object, the main controller of your physics world and simulation:
let Engine = Matter.Engine;
An alias for the Matter.js Engine class
let engine;
A reference to the Matter.js physics engine
function setup() {
createCanvas(640, 360);
engine = Engine.create();
Create the Matter.js engine.
}
Notice that the very first line of code creates an Engine variable and sets it equal to Matter.Engine. Here, I’m deciding to point the single keyword Engine to the Engine class namespaced inside Matter.js in order to make my code less verbose. This works because I know I won’t be using the word Engine for any other variables, nor does it conflict with something in p5.js. I’ll be doing this with Vector, Bodies, Composite, and more as I continue to build the examples. (But while the linked source code will always include all the aliases, I won’t always show them in the book text.)
When you call create() on Engine, Matter.js returns a new physics engine and world with a default gravity—a vector (0, 1) pointing down. You can change this default by accessing the gravity variable:
  engine.gravity.x = 1;
  engine.gravity.y = 0;
Change the engine’s gravity to point horizontally.
Of course, gravity doesn’t have to be fixed for the duration of the simulation; you can adjust the gravity vector while your program is running. You can also turn gravity off altogether by setting it to a (0, 0) vector.
Object Destructuring
Object destructuring in JavaScript is a technique for extracting properties from an object and assigning them to variables. In the case of Matter.js, the Matter object contains the Engine property. Normally, an alias for this property can be set with let Engine = Matter.Engine, but with destructuring, the alias can be created more concisely:
const { Engine } = Matter;
Hold on. Did you catch that I snuck in a const here? I know I said back in Chapter 0 that I would use only let for variable declarations throughout this book. However, working with an external library is a really good time to dip your toe in the const waters. In JavaScript, const is used for declaring variables whose values should never be reassigned after initialization. In this case, I want to protect myself from accidentally overwriting the Engine variable later in the code, which would likely break everything!
With that out of the way, let’s look at how the destructuring syntax really shines when you need to create aliases to multiple properties of the same object:
const { Engine, Vector } = Matter;
Use object destructuring to extract aliases for Engine and Vector.
This sets up Engine as an alias for Matter.Engine, and Vector as an alias for Matter.Vector, all in one statement. I’ll use this technique throughout the chapter’s examples.
Once the world is initialized, it’s time to put stuff in it—bodies!
Bodies
The body is the primary element in the Matter.js world. It’s the equivalent of the Vehicle (née Particle, née Mover) class I built in previous chapters—the thing that moves around the space and experiences forces. A body can also be static (fixed and not moving).
Matter.js bodies are created using factory methods found in Matter.Bodies, with different methods available for creating different kinds of bodies. A factory method is a function that creates an object. While you’re probably more familiar with calling a constructor to create an object—for example, with new Particle()—you’ve seen factory methods before: createVector() is a factory method for creating a p5.Vector object. Whether an object is created from a constructor or a factory method is a matter of style and design choice by a library creator.
All the factory methods for creating bodies can be found in the Matter.Bodies documentation page. I’ll start with the rectangle() method:
let box = Bodies.rectangle(x, y, w, h);
Create a Matter.js body with a rectangular shape.
What luck! The rectangle() method signature is exactly the same as p5.js’s rect() function. In this case, however, the method isn’t drawing a rectangle but rather building the geometry for a Body object to store. (Note that calling Bodies.rectangle() works only if you first establish Bodies as an alias to Matter.Bodies.)
A body has now been created with a position and a size, and a reference to it is stored in the variable box. Bodies have many more properties that affect their motion, however. For example, density ultimately determines that body’s mass. Friction and restitution (bounciness) affect how the body interacts when it comes into contact with other bodies. For most cases, the defaults are sufficient, but Matter.js does allow you to specify these properties by passing through an additional argument to the factory method in the form of a JavaScript object literal, a collection of key-value pairs separated by commas and enclosed in curly brackets:
let options = {
  friction: 0.5,
  restitution: 0.8,
  density: 0.002
};
Specify the properties of this body in an object literal.
let box = Bodies.rectangle(x, y, w, h, options);
Each key in the object literal (for example, friction) serves as a unique identifier, and its value (0.5) is the data associated with that key. You can think of an object literal as a simple dictionary or lookup table—in this case, holding the desired settings for a new Matter.js body. Note, however, that while the options argument is useful for configuring the body, other initial conditions, such as linear or angular velocity, can be set via static methods of the Matter.Body class:
const v = Vector.create(2, 0);
Body.setVelocity(box, v);
Body.setAngularVelocity(box, 0.1);
Set an arbitrary initial linear and angular velocity.
Creating a body and storing it in a variable isn’t enough. Any body must be explicitly added to the world in order for it to be simulated with physics. The physics world is a Composite object called world stored inside the engine itself. The box can be added to that world with the static add() method:
Composite.add(engine.world, box);
Add the box object to the engine’s world.
This extra step is easy to forget—it’s a mistake I’ve made on countless occasions. If you’re ever wondering why one of your objects doesn’t appear or move along with the world’s physics, always check that you’ve actually added it to the world!
Exercise 6.1
Knowing what you know about Matter.js so far, fill in the blank in the following code that demonstrates how to make a circular body:
let options = {
friction: 0.5,
restitution: 0.8,
};
let ball = Bodies.circle(x, y, radius, options);
Render
Once a body is added to the world, Matter.js will always know it’s there, check it for collisions, and update its position appropriately, according to any forces in the environment. It’ll do all that without you having to lift a finger! But how do you draw the body?
In the next section, I’ll show you how to query Matter.js for the position of the various bodies in order to render the world with p5.js. The way that works is fundamental to being able to control the look of your own animations. This is your time to shine: you can be the designer of your world, using your creativity and p5.js skills to visualize the bodies, while politely asking Matter.js to compute all the physics in the background.
That said, Matter.js does include a fairly simple and straightforward Render class, which is incredibly useful for quickly seeing and debugging the world you’ve designed. It provides ways to customize the debug drawing style, but I find the defaults perfectly adequate for quickly double-checking that I’ve configured a world correctly.
The first step is to call Matter.Render.create() (or Render.create(), assuming an alias). This method expects an object with the desired settings for the renderer, which I’ll call params.
let canvas = createCanvas(640, 360);
Store the canvas in a variable.
let params = {
  canvas: canvas.elt,
  engine: engine,
  options: { width: width, height: height }
};
Configure the renderer.
let render = Render.create(params);
Create the renderer.
Notice that I’m storing a reference to the p5.js canvas in the canvas variable. This is necessary because I need to tell the renderer to draw in a specific canvas. Matter.js doesn’t know about p5.js, so the canvas it’s assigned is a native HTML5 canvas, stored inside the elt property of a p5.js canvas object. The engine is the engine I previously created. The Matter.js default canvas dimensions are 800×600, so if I prefer a different size, I need to configure an options property with width and height.
Once I have a render object, I need to tell Matter.js to run it:
Render.run(render);
Run the renderer!
One more critical order of business remains: physics engines must be told to step forward in time. Since I’m using the built-in renderer, I can also use the built-in runner, which runs the engine at a default frame rate of 60 frames per second. The runner is also customizable, but the details aren’t terribly important since the goal here is to move toward using p5.js’s draw() loop instead (coming in the next section):
Runner.run(engine);
Run the engine!
Here’s the Matter.js code all together, with an added ground object—another rectangular body. Note the use of the { isStatic: true } option in the creation of the ground body to ensure that it remains in a fixed position. I’ll cover more details about static bodies in “Static Matter.js Bodies”.
Example 6.1: Matter.js Default Render and Runner
const { Engine, Bodies, Composite, Body, Vector, Render } = Matter;
Note the use of aliases for all the Matter.js classes needed for this sketch.
function setup() {
let canvas = createCanvas(640, 360);
Store a reference to the canvas.
let engine = Engine.create();
Create the physics engine.
  let render = Render.create({
    canvas: canvas.elt, engine,
    options: { width: width, height: height },
  });
  Render.run(render);
Create a renderer and assign it to the p5.js canvas.
  let options = { friction: 0.01, restitution: 0.75 };
  let box = Bodies.rectangle(100, 100, 50, 50, options);
Create a box with custom friction and restitution.
  Body.setVelocity(box, Vector.create(5, 0));
  Body.setAngularVelocity(box, 0.1);
Set the initial velocity of the box.
Composite.add(engine.world, box);
Add the box to the world.
  let ground = Bodies.rectangle(width / 2, height - 5,
                 width, 10, { isStatic: true });
  Composite.add(engine.world, ground);
Create a static body for the ground.
let runner = Matter.Runner.create();
Create the runner.
Matter.Runner.run(runner, engine);
Run the engine.
}
There’s no draw() function here, and all the variables are local to setup(). In fact, I’m not using any p5.js capabilities (beyond injecting a canvas onto the page). This is exactly what I want to tackle next!
Matter.js with p5.js
Matter.js keeps a list of all bodies that exist in the world, and as you’ve just seen, it can handle drawing and animating them with the Render and Runner objects. (That list, incidentally, is stored in engine.world.bodies.) What I’d like to show you now, however, is a technique for keeping your own list(s) of Matter.js bodies, so you can draw them with p5.js.
Yes, this approach may add redundancy and sacrifice a small amount of efficiency, but it more than makes up for that with ease of use and customization. With this methodology, you’ll be able to code as you’re accustomed to in p5.js, keeping track of which bodies are which and drawing them appropriately. Consider the file structure of the sketch shown in Figure 6.3.


Structurally, this looks like just another p5.js sketch. There’s a main sketch.js file, as well as box.js. This sort of extra file is where I’d typically declare a class needed for the sketch—in this case, a Box class describing a rectangular body in the world:
class Box {
constructor(x, y) {
    this.x = x;
    this.y = y;
    this.w = 16;
A box has an (x, y) position and a width.
}
show() {
    rectMode(CENTER);
    fill(127);
    stroke(0);
    strokeWeight(2);
    square(this.x, this.y, this.w);
The box is drawn as a square().
}
}
Now I’ll write a sketch.js file that creates a new Box whenever the mouse is clicked and stores all the Box objects in an array. (This is the same approach I took in the particle system examples from Chapter 4.)
let boxes = [];
An array to store all Box objects
function setup() {
createCanvas(640, 360);
}
function draw() {
background(255);
  if (mouseIsPressed) {
    let box = new Box(mouseX, mouseY);
    boxes.push(box);
  }
When the mouse is clicked, add a new Box object.
  for (let box of boxes) {
    box.show();
  }
Display all the Box objects.
}
Right now, this sketch draws fixed boxes to the screen. Here’s the challenge: How can I instead draw boxes that experience physics (calculated with Matter.js) as soon as they appear, while changing the code as little as possible?
I’ll need three steps to accomplish this goal.
Step 1: Add Matter.js to the p5.js Sketch
As it stands, the sketch makes no reference to Matter.js. That clearly needs to change. Fortunately, this part isn’t too tough: I’ve already demonstrated all the elements needed to build a Matter.js world. (And don’t forget, in order for this to work, make sure the library is imported in index.html.)
First, I need to add aliases for the necessary Matter.js classes and create an Engine object in setup():
const { Engine, Bodies, Composite } = Matter;
Aliases for Engine, Bodies, and Composite
let engine;
The engine is now a global variable!
function setup() {
engine = Engine.create();
Create the engine.
}
Then, in draw(), I need to make sure to call one critical Matter.js method, Engine.update():
function draw() {
Engine.update(engine);
Step the engine forward in time!
}
The Engine.update() method advances the physics world one step forward in time. Calling it inside the p5.js draw() loop ensures that the physics will update at every frame of the animation. This mechanism takes the place of the built-in Matter.js Runner object I used in Example 6.1. The draw() loop is the runner now!
Internally, when Engine.update() is called, Matter.js sweeps through the world, looks at all the bodies in it, and figures out what to do with them. Just calling Engine.update() on its own moves the world forward with default settings. However, as with Render, these settings are customizable and documented in the Matter.js documentation.
Step 2: Link Every Box Object with a Matter.js Body
I’ve set up my Matter.js world; now I need to link each Box object in my p5.js sketch with a body in that world. The original Box class includes variables for position and width. What I now want to say is “I hereby relinquish command of this object’s position to Matter.js. I no longer need to keep track of anything related to position, velocity, or acceleration. Instead, I need to keep track of only the existence of a Matter.js body and have faith that the physics engine will do the rest.”
class Box {
constructor(x, y) {
this.w = 16;
this.body = Bodies.rectangle(x, y, this.w, this.w);
Instead of any of the usual variables, store a reference to a body.
Composite.add(engine.world, this.body);
Don’t forget to add it to the world!
}
I don’t need this.x and this.y position variables anymore. The Box constructor takes in the starting x- and y-coordinates, passes them along to Bodies.rectangle() to create a new Matter.js body, and then forgets about them. As you’ll see, the body itself will keep track of its position behind the scenes. The body could technically keep track of its dimensions as well, but since Matter.js stores them as a list of vertices, it’s a bit more convenient to hold onto the width of the square in the this.w variable for when it comes time to draw the box.
Step 3: Draw the Body

Almost there. Before I introduced Matter.js into the sketch, drawing Box was easy. The object’s position was stored in the variables this.x and this.y:
  show() {
    rectMode(CENTER);
    fill(127);
    stroke(0);
    strokeWeight(2);
    square(this.x, this.y, this.w);
  }
Draw the object by using square().
Now that Matter.js manages the object’s position, I can no longer use my own x and yvariables to draw the shape. But fear not! The Box object has a reference to the Matter.js body associated with it, and that body knows its own position. All I need to do is politely ask the body, “Pardon me, where are you located?”
let position = this.body.position;
Just knowing the position of a body isn’t enough, however. The body is a square, so I also need to know its angle of rotation:
let angle = this.body.angle;
Once I have the position and angle, I can render the object by using the native p5.js translate(), rotate(), and square() functions:
show() {
    let position = this.body.position;
    let angle = this.body.angle;
I need the body’s position and angle.
rectMode(CENTER);
fill(127);
stroke(0);
strokeWeight(2);
push();
    translate(position.x, position.y);
    rotate(angle);
Use the position and angle to translate and rotate the square.
square(0, 0, this.w);
pop();
}
It’s important to note here that if you delete a Box object from the boxes array—perhaps when it moves outside the boundaries of the canvas or reaches the end of its life span, as demonstrated in Chapter 4—you must also explicitly remove the body associated with that Box object from the Matter.js world. This can be done with a removeBody() method on the Box class:
  removeBody() {
    Composite.remove(engine.world, this.body);
  }
This function removes a body from the Matter.js world.
In draw(), you would then iterate over the array in reverse, just as in the particle system examples, and call both removeBody() and splice() to delete the object from the Matter.js world and your array of boxes.
Exercise 6.2
Start with the code for Example 6.2 and, using the methodology outlined in this chapter, add the code to implement Matter.js physics. Delete bodies that have left the canvas. The result should appear as in this image. Feel free to be creative in the way you draw the boxes!
Static Matter.js Bodies

In the example I just created, the Box objects appear at the mouse position and fall downward because of the default gravity force. What if I want to add immovable boundaries to the world that will block the path of the falling Box objects? Matter.js makes this easy with the isStatic property:
let options = { isStatic: true };
let boundary = Bodies.rectangle(x, y, w, h, options);
Create a fixed (static) boundary body.
I’m still creating a body with the Bodies.rectangle() factory method, but setting the isStatic property ensures that the body will never move. I’ll incorporate this feature into the solution to Exercise 6.2 by creating a separate Boundary class that links a p5.js rectangle to a static Matter.js body. For variety, I’ll also randomize the dimensions of each falling box. (See the online code for the changes to the Box class.)
Example 6.3: Falling Boxes Hitting Boundaries
class Boundary {
constructor(x, y, w, h) {
    this.x = x;
    this.y = y;
    this.w = w;
    this.h = h;
A boundary is a simple rectangle with x, y, width, and height.
let options = { isStatic: true };
Lock the body in place by setting isStatic to true!
this.body = Bodies.rectangle(this.x, this.y, this.w, this.h, options);
Composite.add(engine.world, this.body);
}
  show() {
    rectMode(CENTER);
    fill(127);
    stroke(0);
    strokeWeight(2);
    rect(this.x, this.y, this.w, this.h);
Since the boundary can never move, show() can draw it
the old-fashioned way, using the original
variables. No need to query Matter.js.
}
}
Static bodies don’t incorporate material properties like restitution or friction. Make sure you set those in the dynamic bodies in your world.
Polygons and Groups of Shapes
Now that I’ve demonstrated how easy it is to use a primitive shape like a rectangle or circle with Matter.js, let’s imagine that you want to create a more interesting body, such as the abstract character in Figure 6.4.

Two strategies can be used to make such complex forms. The generic Bodies.polygon() method can create any regular polygon (pentagon, hexagon, and so on). Additionally, Bodies.trapezoid() makes a quadrilateral with at least one pair of parallel sides:
let hexagon = Bodies.polygon(x, y, 6, radius);
A regular hexagon (six-sided polygon)
let trapezoid = Bodies.trapezoid(x, y, width, height, slope);
A trapezoid
A more general-purpose option is Bodies.fromVertices(). It builds a shape from an array of vectors, treating them as a series of connected vertices. I’ll encapsulate this logic in a CustomShape class.
Example 6.4: Polygon Shapes
class CustomShape {
constructor(x, y) {
    let vertices = [];
    vertices[0] = Vector.create(-10, -10);
    vertices[1] = Vector.create(20, -15);
    vertices[2] = Vector.create(15, 0);
    vertices[3] = Vector.create(0, 10);
    vertices[4] = Vector.create(-20, 15);
An array of five vectors
    let options = { restitution: 1 };
    this.body = Bodies.fromVertices(x, y, vertices, options);
Make a body shaped by the vertices.
Body.setVelocity(this.body, Vector.create(random(-5, 5), 0));
Body.setAngularVelocity(this.body, 0.1);
Composite.add(engine.world, this.body);
}
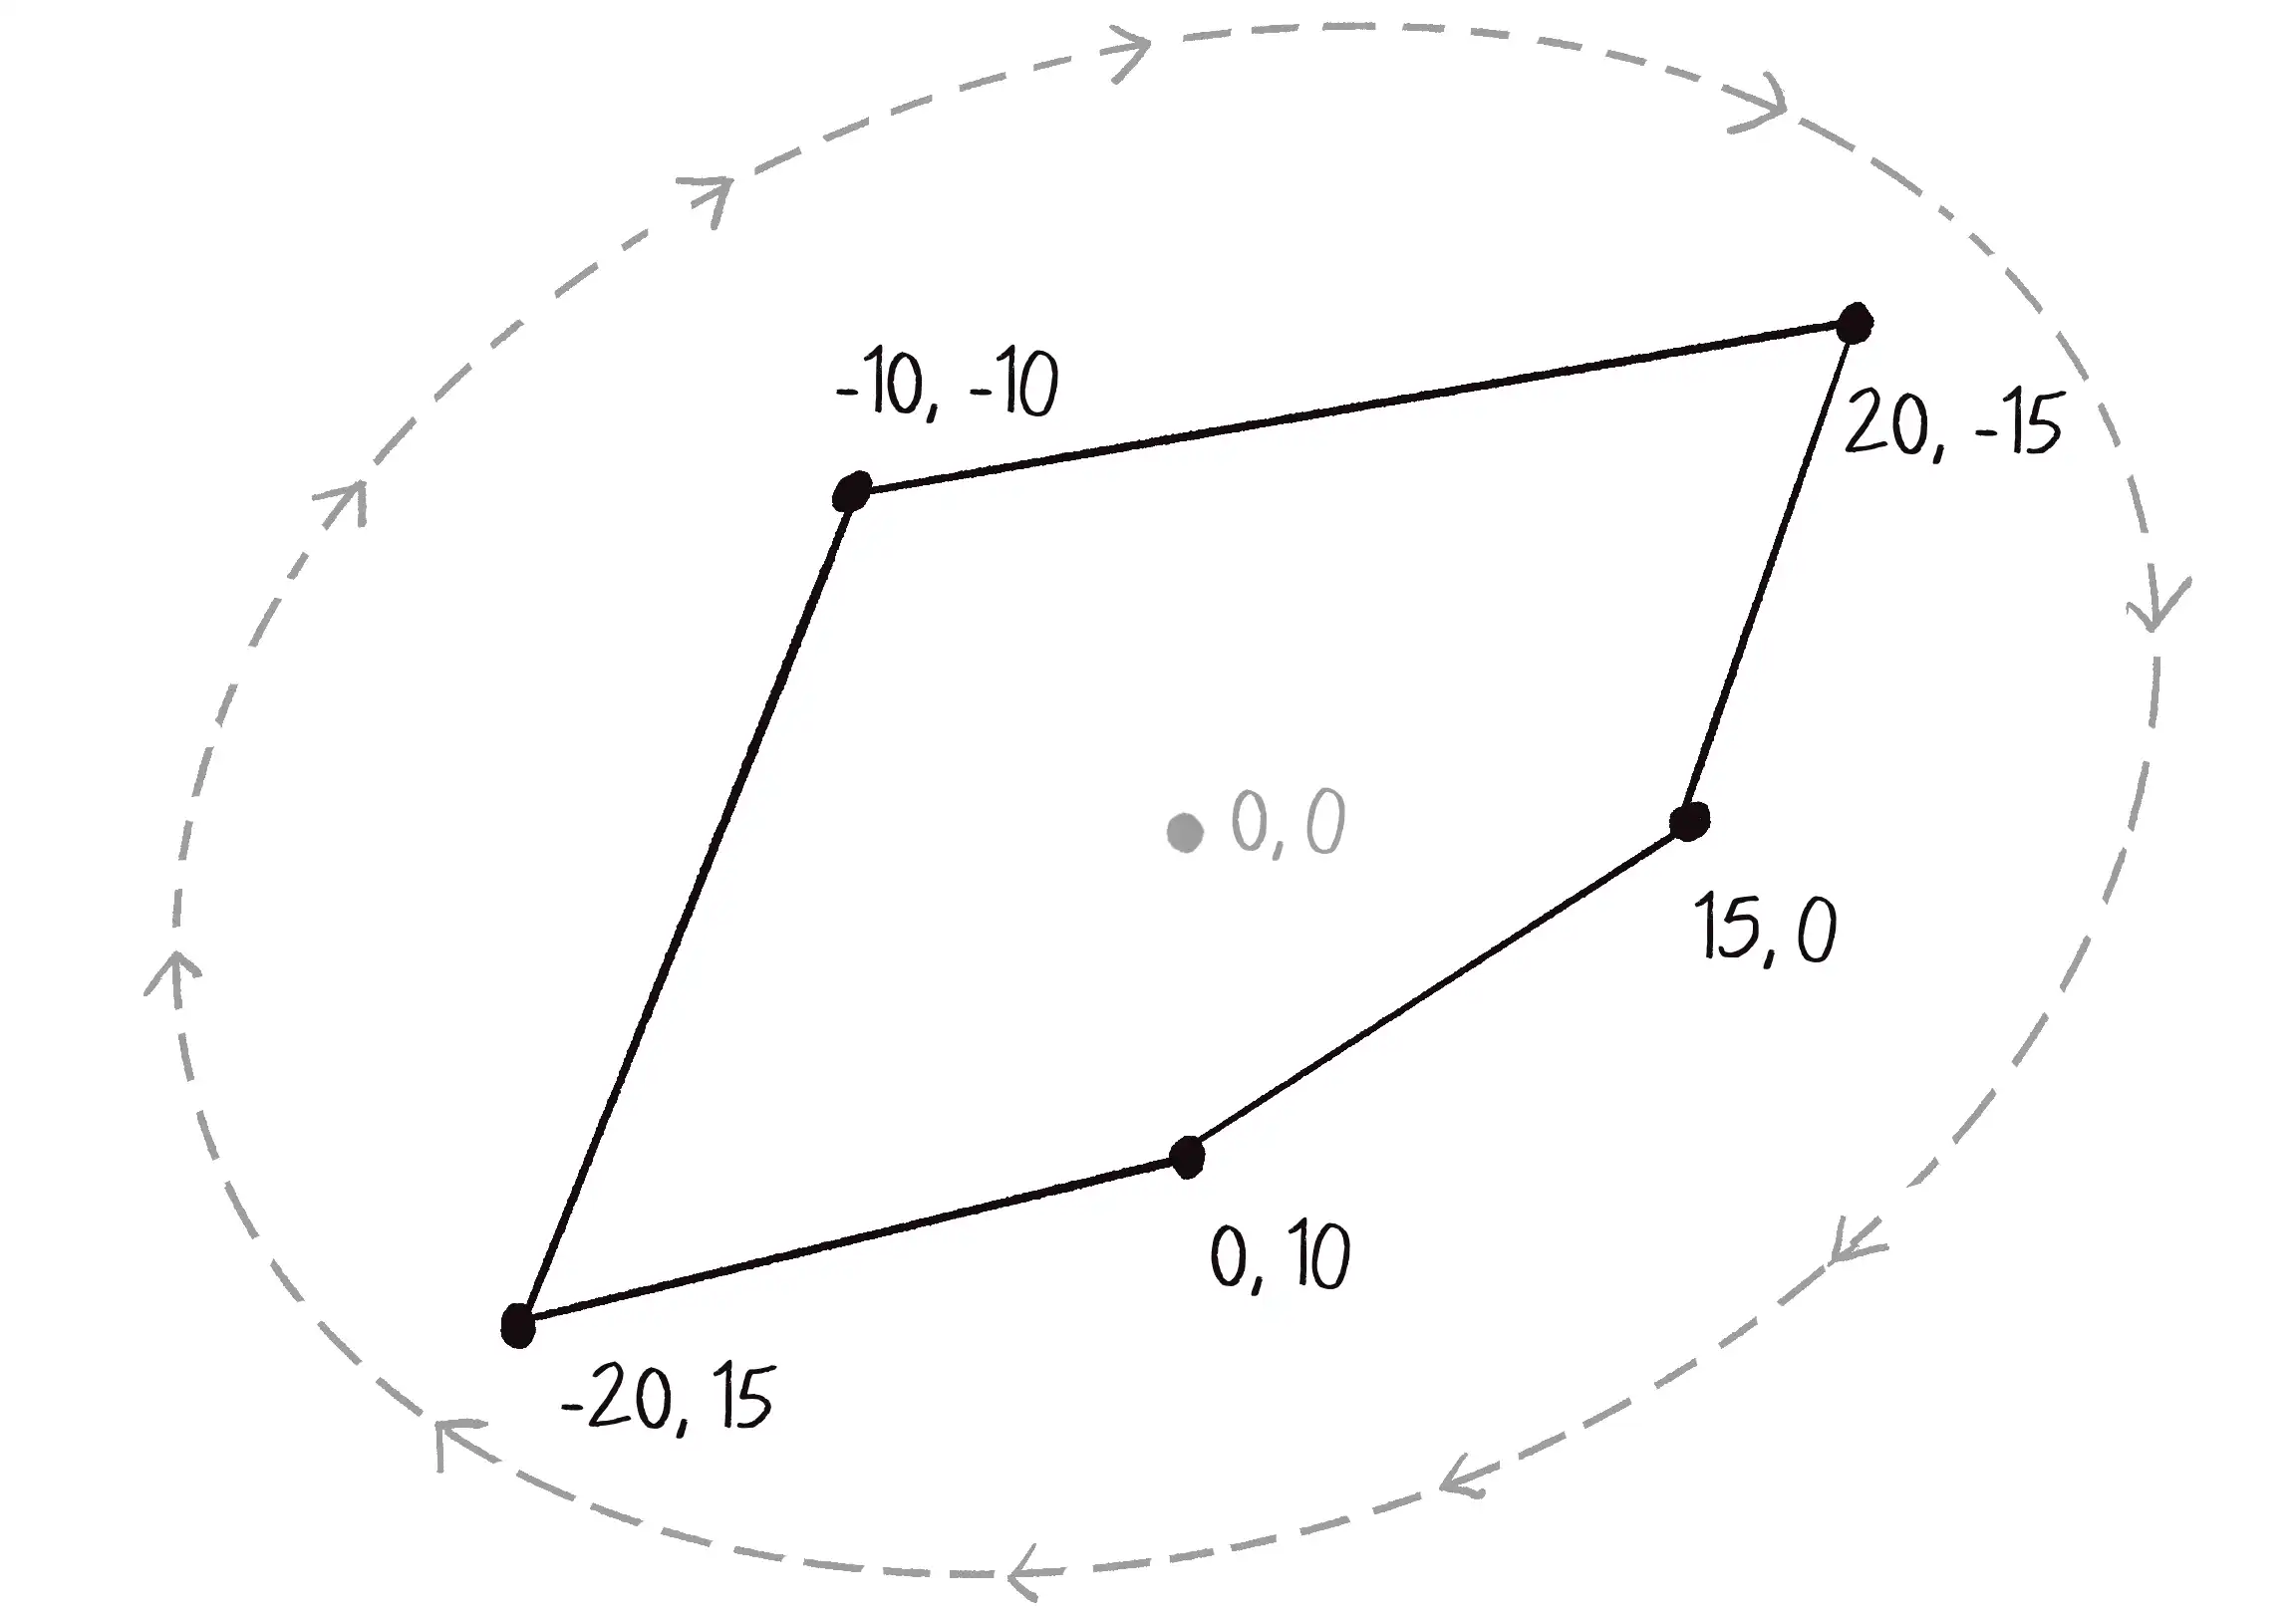
When creating a custom polygon in Matter.js, you must remember two important details. First, the vertices must be specified in clockwise order. For instance, Figure 6.5 shows the five vertices used to create the bodies in Example 6.4. Notice that the example added them to the vertices array in clockwise order from the top left.

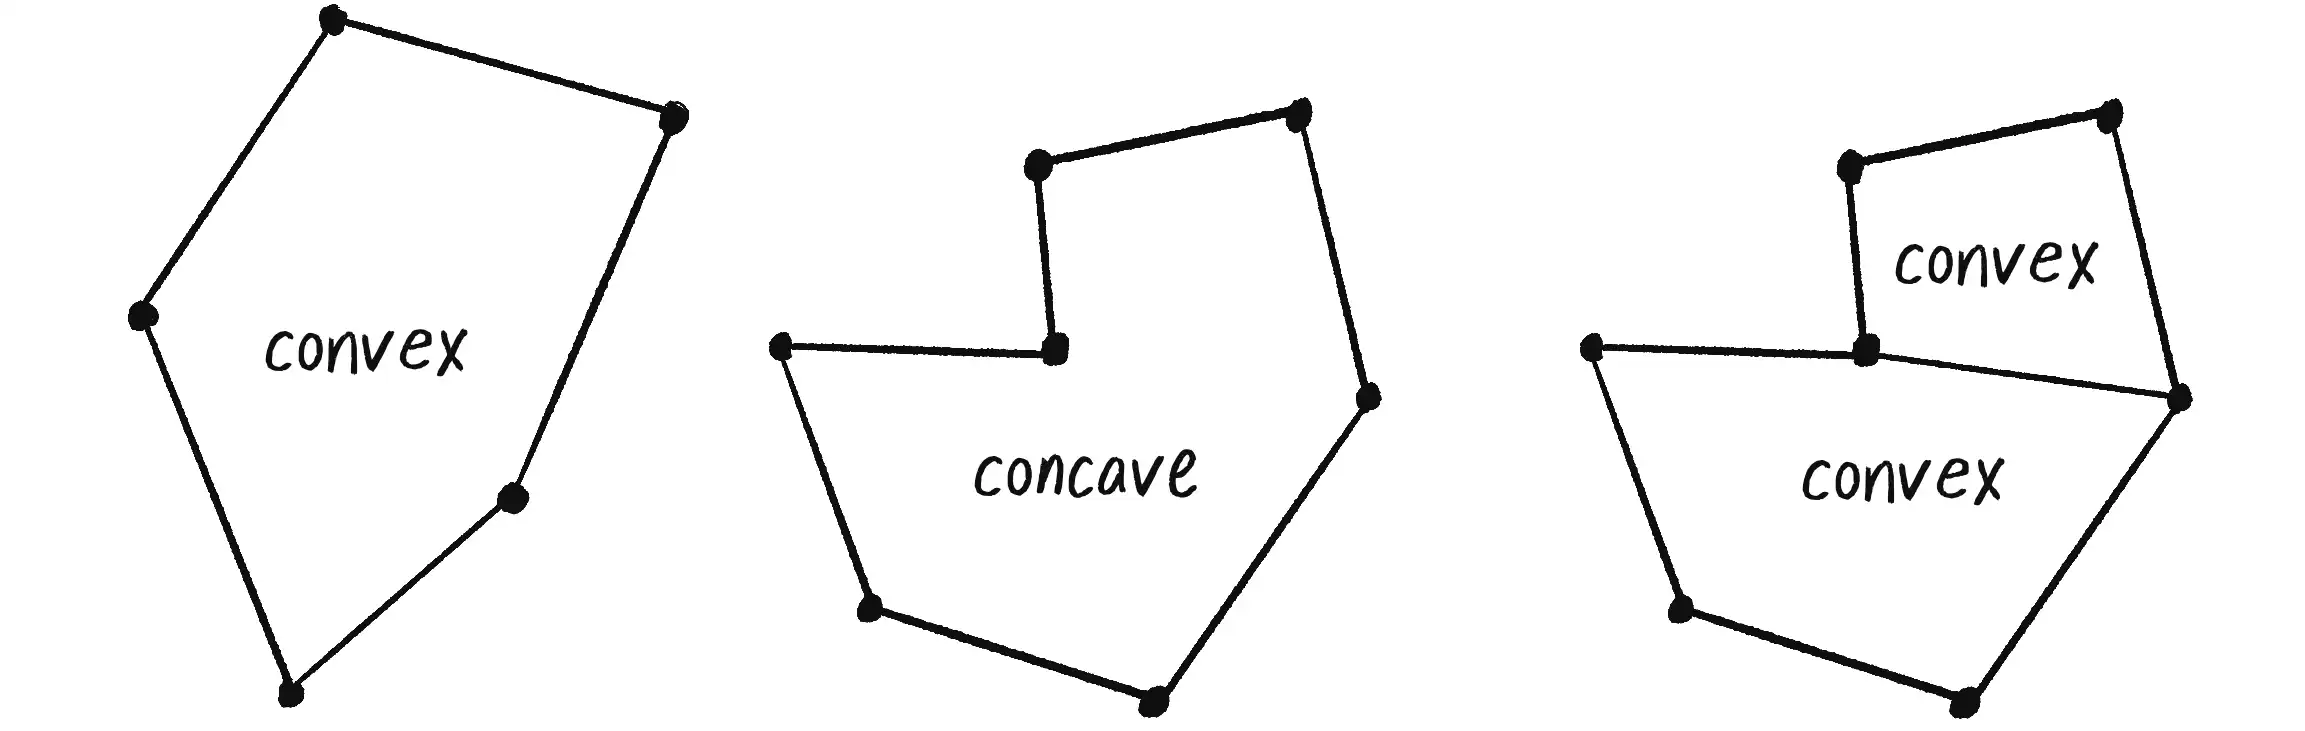
Second, each shape must be convex, not concave. As shown in Figure 6.6, a concave shape has a surface that curves inward, whereas convex is the opposite. Every internal angle in a convex shape must be 180 degrees or less. Matter.js can work with concave shapes, but you need to build them out of multiple convex shapes (more about that in a moment).

Since the shape is built out of custom vertices, you can use p5.js’s beginShape(), endShape(), and vertex() functions when it comes time to actually draw the body. The CustomShape class could include an array to store the vertices’ pixel positions, relative to (0, 0), for drawing purposes. However, it’s best to query Matter.js for the positions instead. This way, there’s no need to use translate() or rotate(), since the Matter.js body stores its vertices as absolute world positions:
show() {
fill(127);
stroke(0);
strokeWeight(2);
beginShape();
Start the shape.
    for (let v of this.body.vertices) {
      vertex(v.x, v.y);
    }
Loop through the body vertices.
endShape(CLOSE);
End the shape, closing it.
}
}
The Matter.js body stores the array of its vertex positions inside a vertices property. Notice that I can then use a for...of loop to cycle through the vertices between beginShape() and endShape().
Exercise 6.3
Using Bodies.fromVertices(), create your own polygon design (remember, it must be convex). Some possibilities are shown here.


A custom shape built from an array of vertices will get you pretty far. However, the convex shape requirement does limit the range of possibilities. The good news is that you can eliminate this restriction by creating a compound body made up of multiple shapes! How about creating a delicious lollipop with a thin rectangle and a circle on top?
I’ll start by creating two individual bodies, one rectangle and one circle. Then I can join them by putting them in a parts array and passing the array to Body.create():
let part1 = Bodies.rectangle(x, y, w, h);
let part2 = Bodies.circle(x, y, r);
Make the bodies.
let body = Body.create({ parts: [part1, part2] });
Join the two bodies together in an array.
Composite.add(engine.world, body);
Add the compound body to the world.
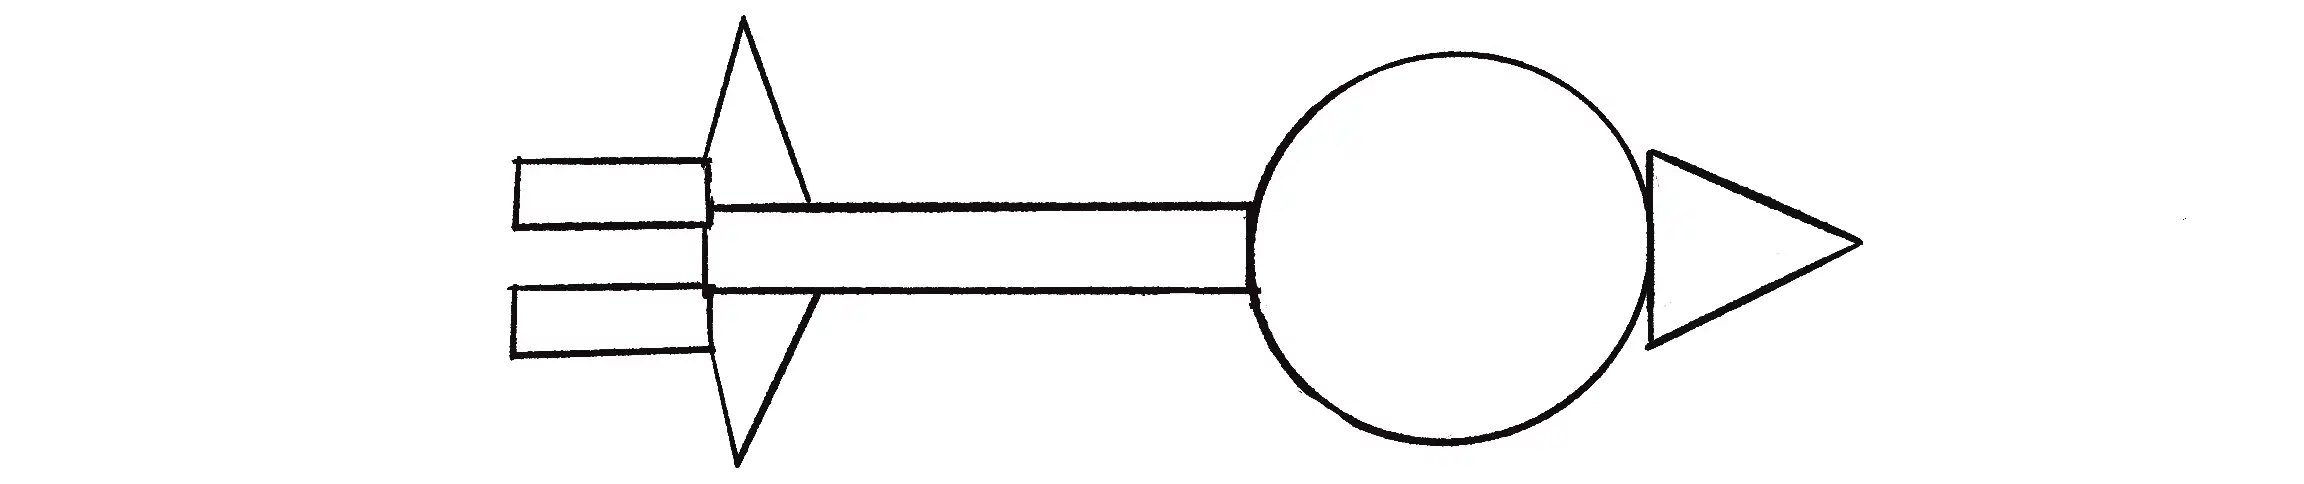
While this does create a compound body by combining two shapes, the code isn’t quite right. If you run it, you’ll see that both shapes are centered on the same (x, y) position, as in Figure 6.7.

Instead, I need to offset the center of the circle horizontally from the center of the rectangle, as in Figure 6.8.

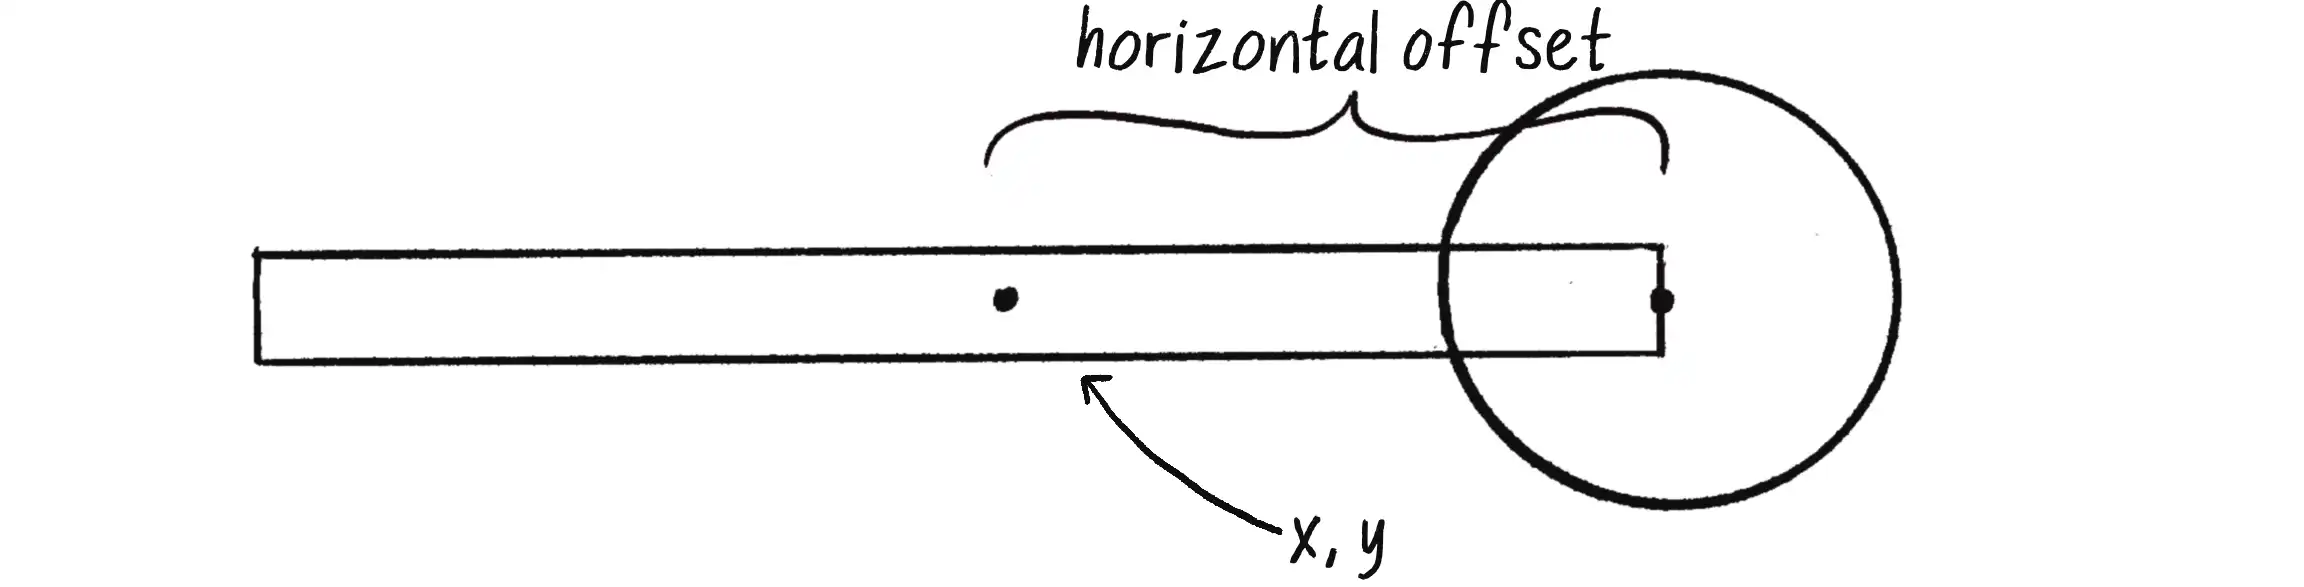
I’ll use half the width of the rectangle as the offset, so the circle is centered on the edge of the rectangle:
let part1 = Bodies.rectangle(x, y, w, h);
let offset = w / 2;
let part2 = Bodies.circle(x + offset, y, r);
Add an offset from the x-position of the lollipop’s stick.
Because the lollipop’s body has two parts, drawing it is a bit trickier. I could take multiple approaches. For example, I could use the body’s vertices array and draw the lollipop as a custom shape, much like Example 6.4. (Every body stores an array of vertices, even if it wasn’t created with the fromVertices() method.) Since each part of the lollipop is a primitive shape, however, I’d prefer to separately translate to each part’s position and rotate by the collective body’s angle.
Example 6.5: Multiple Shapes on One Body
show() {
let angle = this.body.angle;
The angle comes from the compound body.
    let position1 = this.part1.position;
    let position2 = this.part2.position;
Get the position for each part.
fill(200);
stroke(0);
    push();
    translate(position1.x, position1.y);
    rotate(angle);
    rectMode(CENTER);
    rect(0, 0, this.w, this.h);
    pop();
Translate and rotate the rectangle (part1).
    push();
    translate(position2.x, position2.y);
    rotate(angle);
    circle(0, 0, this.r * 2);
    pop();
Translate and rotate the circle (part2).
}
Before moving on, I want to stress that what you draw in your canvas window doesn’t magically experience perfect physics just by the mere act of creating Matter.js bodies. The chapter’s examples have worked because I’ve been carefully matching the way I’ve drawn each p5.js body with the way I’ve defined the geometry of each Matter.js body. If you accidentally draw a shape differently, you won’t get an error—not from p5.js or from Matter.js. However, your sketch will look odd, and the physics won’t work correctly because the world you’re seeing won’t be aligned with the world as Matter.js understands it.
To illustrate, let me return to Example 6.5. A lollipop is a compound body consisting of two parts, a rectangle (this.part1) and a circle (this.part2). I’ve been drawing each lollipop by getting the positions for the two parts separately: this.part1.position and this.part2.position. However, the overall compound body also has a position, this.body.position. It would be tempting to use that as the position for drawing the rectangle, and to figure out the circle’s position manually using an offset. After all, that’s how I conceived of the compound shape to begin with (look back at Figure 6.8):
show() {
let position = this.body.position;
Getting the body position rather than the parts
let angle = this.body.angle;
push();
translate(position.x, position.y);
rotate(angle);
rect(0, 0, this.w, this.h);
circle(0, this.h / 2, this.r * 2);
pop();
}
Figure 6.9 shows the result of this change.
At first glance, this new version may look fine, but if you look closer, the collisions are off and the shapes overlap in odd ways. This isn’t because the physics is broken; it’s because I’m not communicating properly between p5.js and Matter.js. It turns out the overall body position isn’t the center of the rectangle, but rather the center of mass between the rectangle and the circle. Matter.js is calculating the physics and managing collisions as before, but I’m drawing each body in the wrong place! (In the online version, you can toggle the correct and incorrect renderings by clicking the mouse.)
Exercise 6.4
Make your own little alien being by using multiple shapes attached to a single body. Remember, you aren’t limited to using the basic shape-drawing functions in p5.js; you can use images and colors, add hair with lines, and more. Think of the Matter.js shapes as skeletons for your original fantastical design!
Matter.js Constraints

A Matter.js constraint is a mechanism to connect one body to another, enabling simulations of swinging pendulums, elastic bridges, squishy characters, wheels spinning on an axle, and more. Constraints have three types: distance constraints and revolute constraints, both managed through the Constraint class, and mouse constraints, managed through the MouseConstraint class.
Distance Constraints

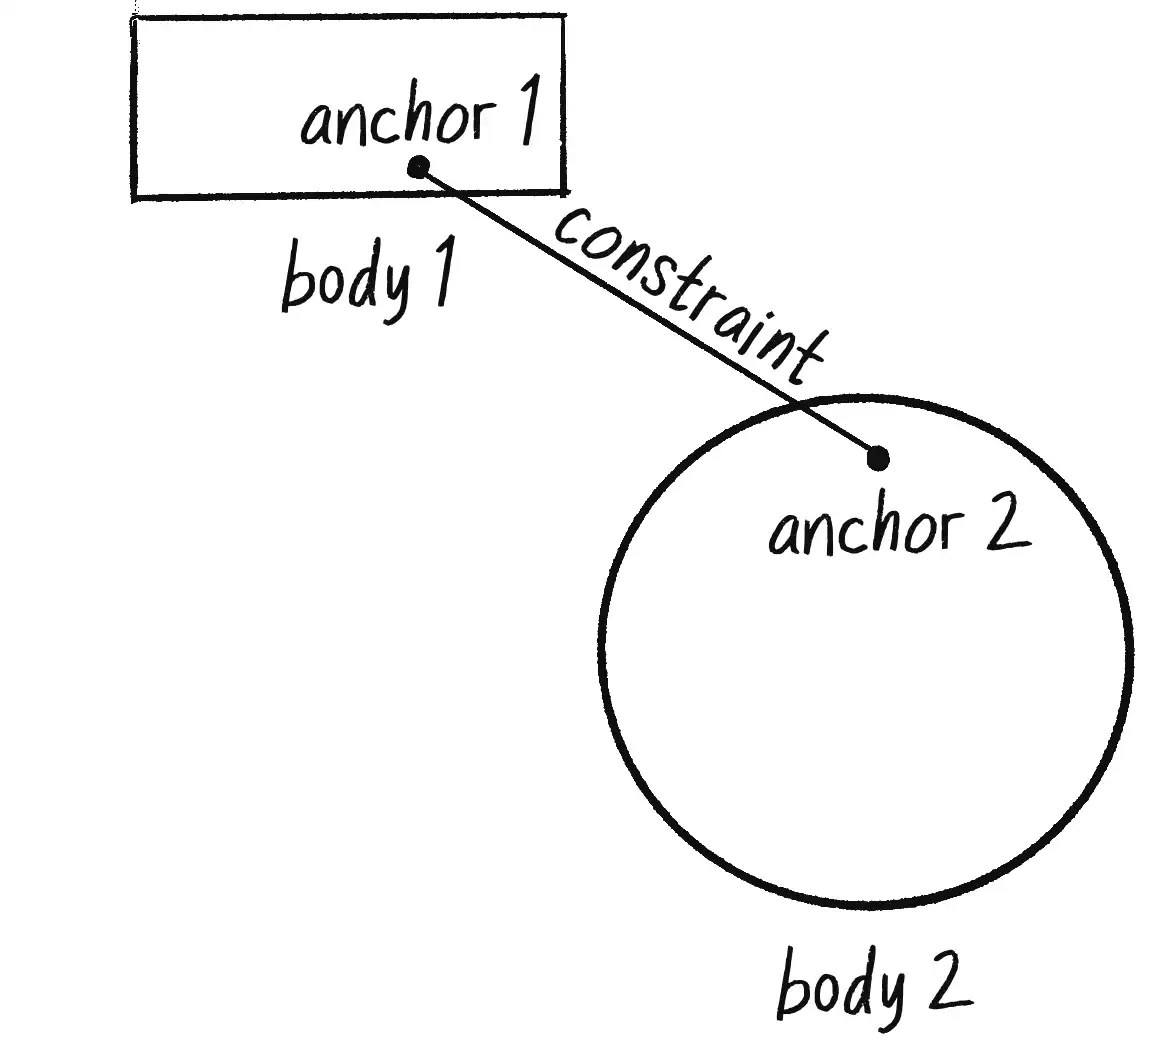
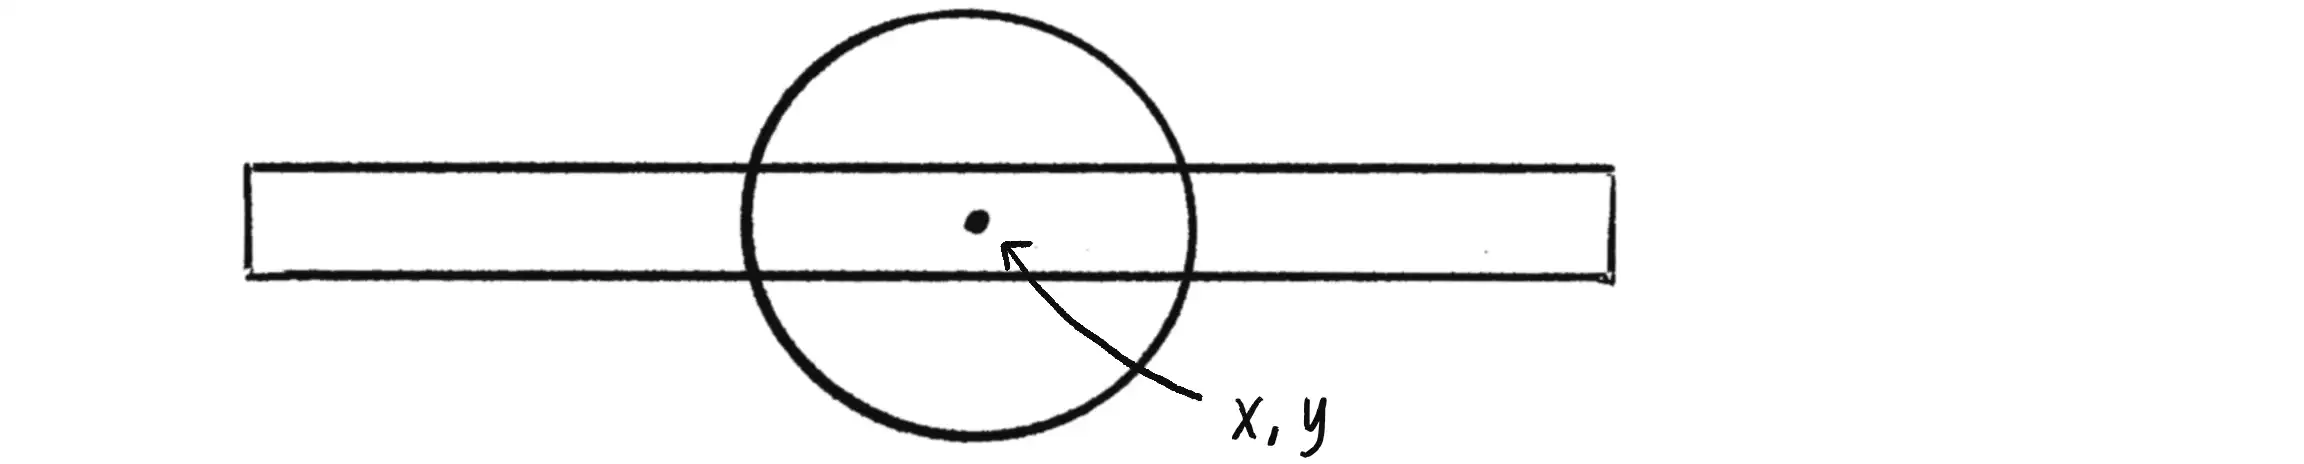
A distance constraint is a connection of fixed length between two bodies, similar to a spring force connecting two shapes in Chapter 3. The constraint is attached to each body at a specified anchor, a point relative to the body’s center (see Figure 6.10). Depending on the constraint’s stiffness property, the “fixed” length can exhibit variability, much as a spring can be more or less rigid.
Defining a constraint uses a similar methodology as creating bodies, only you need to have two bodies ready to go. Let’s assume that two Particle objects each store a reference to a Matter.js body in a property called body. I’ll call them particleA and particleB:
let particleA = new Particle();
let particleB = new Particle();
I want to create a constraint between these particles. For that, I need to define a series of options that determine the constraint’s behavior:
bodyA: The first body that the constraint connects, establishing one end of the constraint.bodyB: The second body that the constraint connects, forming the other end.pointA: The position, relative tobodyA, where the constraint is anchored to the first body.pointB: The position, relative tobodyB, where the constraint is anchored to the second body.length: The resting or target length of the constraint. The constraint will attempt to maintain this length during the simulation.stiffness: A value from 0 to 1 that represents the rigidity of the constraint, with 1 being fully rigid and 0 being completely soft.
These settings get packaged up in an object literal:
let options = {
bodyA: particleA.body,
bodyB: particleB.body,
pointA: Vector.create(0, 0),
pointB: Vector.create(0, 0),
length: 100,
stiffness: 0.5
};
Technically, the only required options are bodyA and bodyB, the two bodies connected by the constraint. If you don’t specify any additional options, Matter.js will choose defaults for the other properties. For example, it will use (0, 0) for each relative anchor point (the body’s center), set the length to the current distance between the bodies, and assign a default stiffness of 0.7. Two other notable options I didn’t include are damping and angularStiffness. The damping option affects the constraint’s resistance to motion, with higher values causing the constraint to lose energy more quickly. The angularStiffness option controls the rigidity of the constraint’s angular motion, with higher values resulting in less angular flexibility between the bodies.
Once the options are configured, the constraint can be created. As usual, this assumes another alias—Constraint is equal to Matter.Constraint:
let constraint = Constraint.create(options);
Composite.add(engine.world, constraint);
Don’t forget to add the constraint to the world!
I can include a constraint to a class to encapsulate and manage the relationships among multiple bodies. Here’s an example of a class that represents a swinging pendulum (mirroring Example 3.11 from Chapter 3).
Example 6.6: Matter.js Pendulum
class Pendulum {
constructor(x, y, len) {
this.r = 12;
this.len = len;
    this.anchor = Bodies.circle(x, y, this.r, { isStatic: true });
    this.bob = Bodies.circle(x + len, y, this.r, { restitution: 0.6 });
Create two bodies, one for the anchor and one for the bob. The anchor is static.
    let options = {
      bodyA: this.anchor,
      bodyB: this.bob,
      length: this.len,
    };
    this.arm = Constraint.create(options);
Create a constraint connecting the anchor and the bob.
    Composite.add(engine.world, this.anchor);
    Composite.add(engine.world, this.bob);
    Composite.add(engine.world, this.arm);
Add all bodies and constraints to the world.
}
show() {
fill(127);
stroke(0);
    line(this.anchor.position.x, this.anchor.position.y,
         this.bob.position.x, this.bob.position.y);
Draw a line representing the pendulum arm.
    push();
    translate(this.anchor.position.x, this.anchor.position.y);
    rotate(this.anchor.angle);
    circle(0, 0, this.r * 2);
    line(0, 0, this.r, 0);
    pop();
Draw the anchor.
    push();
    translate(this.bob.position.x, this.bob.position.y);
    rotate(this.bob.angle);
    circle(0, 0, this.r * 2);
    line(0, 0, this.r, 0);
    pop();
Draw the bob.
}
}
Example 6.6 uses a default stiffness of 0.7. If you try a lower value, the pendulum will appear more like a soft spring.
Exercise 6.5
Create a simulation of a bridge by using constraints to connect a sequence of circles (or rectangles) as shown in the following image. Use the isStatic property to lock the endpoints in place. Experiment with different values to make the bridge more or less springy. The joints have no physical geometry, so in order for your bridge not to have holes, spacing between the nodes will be important.
Revolute Constraints


Another kind of connection between bodies common to physics engines is a revolute joint. This type of constraint connects two bodies at a common anchor point, also known as a hinge (see Figure 6.11). While Matter.js doesn’t have a separate revolute constraint, you can make one with a regular Constraint of length 0. This way, the bodies can rotate around a common anchor point.
The first step is to create the connected bodies. For a first example, I’d like to create a spinning rectangle (akin to a propeller or windmill) in a fixed position. For this case, I need only one body connected to a point. This simplifies the code since I don’t have to worry about collisions between the two bodies connected at a hinge.
let body = Bodies.rectangle(x, y, w, h);
Composite.add(engine.world, body);
Create a body at a given position with width and height.
Next, I can create the constraint. With a length of 0, it needs a stiffness of 1; otherwise, the constraint may not be stable enough to keep the body connected at the anchor point:
let options = {
  bodyA: this.body,
  pointB: { x: x, y: y },
  length: 0,
  stiffness: 1,
};
The constraint connects the body to a fixed (x, y) position with a length of 0 and stiffness of 1.
let constraint = Matter.Constraint.create(options);
Composite.add(engine.world, constraint);
Create the constraint and add it to the world.
Putting the code together, I’ll write a sketch with a class called Windmill representing a rotating body. The sketch also includes a Particle class for dropping particles onto the windmill.
Example 6.7: Spinning Windmill
class Windmill {
constructor(x, y, w, h) {
this.w = w;
this.h = h;
    this.body = Bodies.rectangle(x, y, w, h);
    Composite.add(engine.world, this.body);
The rotating body
    let options = {
      bodyA: this.body,
      pointB: { x: x, y: y },
      length: 0,
      stiffness: 1,
    };
    this.constraint = Constraint.create(options);
    Composite.add(engine.world, this.constraint);
The revolute constraint
}
show() {
rectMode(CENTER);
fill(127);
stroke(0);
strokeWeight(2);
push();
translate(this.body.position.x, this.body.position.y);
push();
rotate(this.body.angle);
rect(0, 0, this.w, this.h);
pop();
line(0, 0, 0, height);
Draw a stand for the windmill (not part of the physics).
pop();
}
}
Notice the line in this example representing the windmill stand. It isn’t part of the Matter.js physics world, and I never created a body for it. This illustrates an important point about working with a physics engine alongside p5.js: you can add elements to the canvas that contribute to the visual design without affecting the physics, as long as you don’t need those elements to participate in the simulation itself.
Exercise 6.6
Create a vehicle that has revolute joints for its wheels. Consider the size and positioning of the wheels. How does changing the stiffness property affect their movement?


Mouse Constraints

Before I introduce the MouseConstraint class, consider the following question: How do you set the position of a Matter.js body to the mouse position? More to the point, why would you need a constraint for this? After all, you have access to the body’s position, and you have access to the mouse’s position. What’s wrong with assigning one to the other?
body.position.x = mouseX;
body.position.y = mouseY;
While this code will move the body, it will also have the unfortunate result of breaking the physics. Imagine you’ve built a teleportation machine that allows you to move instantly from your bedroom to your kitchen (good for late-night snacking). That’s easy enough to imagine, but now go ahead and rewrite Newton’s laws of motion to account for the possibility of teleportation. Not so easy anymore, is it?
Matter.js has the same problem. If you manually assign the position of a body, it’s like saying, “Teleport that body,” and Matter.js no longer knows how to compute the physics properly. However, Matter.js does allow you to tie a string around your waist and have a friend of yours stand in the kitchen and drag you there. Replace your friend with your mouse, and that’s what a mouse constraint is.
Imagine that the moment you click the mouse over a shape, the mouse attaches to that body with a string. Now you can move the mouse around, and it will drag the body around with it until you release the mouse. This works in a similar fashion as a revolute joint in that you can set the length of that “string” to 0, effectively moving a shape with the mouse.
Before you can attach the mouse, however, you need to create a Matter.js Mouse object that listens for mouse interactions with the p5.js canvas:
const { Mouse, MouseConstraint } = Matter;
Aliases for Matter.js Mouse and MouseConstraint
let canvas = createCanvas(640, 240);
Need a reference to the p5.js canvas to listen for the mouse
let mouse = Mouse.create(canvas.elt);
Create a Matter mouse attached to the native HTML5 canvas element.
Next, use the mouse object to create a MouseConstraint:
let mouseConstraint = MouseConstraint.create(engine, { mouse });
Composite.add(engine.world, mouseConstraint);
This will instantly allow you to interact with all Matter.js bodies via the mouse. You don’t need to explicitly attach the constraint to a particular body; any body you click will be constrained to the mouse.
You can also configure all the usual constraint variables by adding a constraint property to the options passed into the MouseConstraint.create() method:
mouse = Mouse.create(canvas.elt);
let options = {
mouse,
constraint: { stiffness: 0.7 }
Customize the constraint with additional properties.
};
mouseConstraint = MouseConstraint.create(engine, options);
Composite.add(engine.world, mouseConstraint);
Here’s an example demonstrating a MouseConstraint with two Box objects. Static bodies act as walls around the borders of the canvas.
Example 6.8: MouseConstraint Demonstration
In this example, you’ll see that the stiffness property of the constraint is set to 0.7, giving a bit of elasticity to the imaginary mouse string. Other properties such as angularStiffness and damping can also influence the mouse’s interaction. What happens if you adjust these values?
Adding More Forces
In Chapter 2, I covered how to build an environment with multiple forces at play. An object might respond to gravitational attraction, wind, air resistance, and so on. Clearly, forces are at work in Matter.js as rectangles and circles spin and fly around the screen! But so far, I’ve demonstrated how to manipulate only a single global force: gravity.
let engine = Engine.create();
  engine.gravity.x = 1;
  engine.gravity.y = 0;
Change the engine’s gravity to point horizontally.
If I want to use any of the Chapter 2 techniques with Matter.js, I need look no further than the trusty applyForce() method, which I wrote as part of the Mover class. It received a vector, divided it by mass, and accumulated it into the mover’s acceleration. With Matter.js, the same method exists, so I no longer need to write all the details myself! I can call it with the static Body.applyForce(). Here’s what that looks like in what’s now the Box class:
class Box {
applyForce(force) {
Body.applyForce(this.body, this.body.position, force);
Call Body’s applyForce().
}
}
Here, the Box class’s applyForce() method receives a force vector and simply passes it along to Matter.js’s applyForce() method to apply it to the corresponding body. The key difference with this approach is that Matter.js is a more sophisticated engine than the examples from Chapter 2. The earlier examples assumed that the force was always applied at the mover’s center. Here, I’ve specified the exact position on the body where the force is applied. In this case, I’ve just applied it to the center as before by asking the body for its position, but this could be adjusted—for example, a force pushing at the edge of a box, causing it to spin across the canvas, much like dice tumbling when thrown.
How can I bring forces into a Matter.js-driven sketch? Say I want to use a gravitational attraction force. Remember the code from Example 2.6 in the Attractor class?
attract(mover) {
let force = p5.Vector.sub(this.position, mover.position);
let distance = force.mag();
distance = constrain(distance, 5, 25);
let strength = (G * this.mass * mover.mass) / (distance * distance);
force.setMag(strength);
return force;
}
I can rewrite the exact same method by using Matter.Vector and incorporate it into a new Attractor class.
Example 6.9: Attraction with Matter.js
class Attractor {
constructor(x, y) {
    this.radius = 32;
    this.body = Bodies.circle(x, y, this.radius, { isStatic: true });
    Composite.add(engine.world, this.body);
The attractor is a static Matter.js body.
}
attract(mover) {
    let force = Vector.sub(this.body.position, mover.body.position);
    let distance = Vector.magnitude(force);
The attract() method now uses Matter.js vector functions.
distance = constrain(distance, 5, 25);
let G = 0.02;
Use a small value for G to keep the system stable.
let strength = (G * mover.body.mass) / (distance * distance);
The mover��’s mass is included here, but the attractor’s mass is left out since, as a static body, it is equivalent to infinity.
    force = Vector.normalise(force);
    force = Vector.mult(force, strength);
More Matter.js vector functions
return force;
}
}
In addition to writing a custom attract() method for Example 6.9, two other key elements are required for the sketch to behave more like the example from Chapter 2. First, remember that a Matter.js Engine has a default gravity pointing down. I need to disable it in setup() with a (0, 0) vector:
engine = Engine.create();
engine.gravity = Vector.create(0, 0);
Disable the default gravity.
Second, bodies in Matter.js are created with a default air resistance that causes them to slow down as they move. I need to set this to 0 as well to simulate the bodies being in the vacuum of space:
class Mover {
constructor(x, y, radius) {
this.radius = radius;
let options = { frictionAir: 0 };
Disable the default air resistance.
this.body = Bodies.circle(x, y, this.radius, options);
}
This is also a good time to revisit the concept of mass. Although I’m accessing the mass property of the body associated with the mover in the attract() method, I never explicitly set it. In Matter.js, the mass of a body is automatically calculated based on its size (area) and density. Larger bodies will therefore have a greater mass. To increase the mass relative to the size, you can try setting a density property in the options object (the default is 0.001). For static bodies, such as the attractor, the mass is considered infinite. This is how the attractor stays locked in position despite the movers continuously knocking into it.
Exercise 6.7
Incorporate Body.applyForce() into a new spin() method for Example 6.7’s Windmill class to simulate a motor continuously rotating the windmill.
Exercise 6.8
Convert any of the steering behavior examples from Chapter 5 to Matter.js. What does flocking look like with collisions?
Collision Events
This book isn’t called The Nature of Matter.js, so I’m not going to cover every possible feature of the Matter.js library. At this point, I’ve gone over the basics of creating bodies and constraints, and shown you some of what the library can do. With the skills you’ve gained, hopefully the learning process will be considerably less painful when it comes time to use an aspect of Matter.js that I haven’t addressed here. Before moving on, however, one more feature of the library is worth covering: collision events.
Here’s a question you’ve likely been wondering about: “What if I want something extra to happen when two bodies collide? I mean, don’t get me wrong—I’m thrilled that Matter.js is handling all the collisions behind the scenes. But if it’s taking care of the collisions for me, how am I supposed to know when they’re happening?”
Your first thoughts to answer this question might be as follows: “Well, I know all the bodies in the system, and I know where they’re all located. I can just start comparing the bodies’ positions and see which ones are intersecting. Then I can do something extra for the bodies that are determined to be colliding.”
That’s a nice thought, but hello? The whole point of using a physics engine like Matter.js is that it will take care of all that work for you. If you’re going to implement the computational geometry algorithms to test for intersection, you’re basically implementing your own Matter.js!
Of course, wanting to know when bodies are colliding is a pretty common problem, so Matter.js has anticipated it. It can alert you to moments of collision with an event listener. If you’ve worked with mouse or keyboard interaction in p5.js, you already have experience with event listeners. Consider the following:
function mousePressed() {
  print("The mouse was pressed!");
}
A mousePressed event you’ve probably written many times before
The global mousePressed() function in p5.js is executed whenever the mouse is clicked. This is known as a callback, a function that’s called back at a later time when an event occurs. Matter.js collision events operate in a similar fashion. Instead of p5.js just knowing to look for a function called mousePressed() when a mouse event occurs, however, you have to explicitly define the name for a Matter.js collision callback:
Matter.Events.on(engine, 'collisionStart', handleCollisions);
This code specifies that a function named handleCollisions should be executed whenever a collision between two bodies starts. Matter.js also has events for 'collisionActive' (executed over and over for the duration of an ongoing collision) and 'collisionEnd' (executed when two bodies stop colliding), but for a basic demonstration, knowing when the collision begins is more than adequate.
Just as mousePressed() is triggered when the mouse is clicked, handleCollisions() (or whatever you choose to name the callback function) is triggered when two shapes collide. It can be written as follows:
function handleCollisions(event) {
}
Notice that the function includes an event parameter. This is an object that includes all the data associated with a collision (or multiple collisions if more than one has occurred in that time step), such as which bodies are involved. Matter.js automatically creates this object and passes it along to the handleCollisions() callback every time a collision occurs.
Say I have a sketch of Particle objects. Each stores a reference to a Matter.js body, and I want the particles to change color when they collide. Here’s the process to follow to make that happen.
Step 1: Event, could you tell me which two things collided?
Now, what has collided here? Matter.js detects collisions between a pair of bodies. Any pair of colliding bodies will be in an array called pairs inside the event object. Inside handleCollisions(), I can use a for...of loop to iterate over those pairs:
for (let pair of event.pairs) {
}
Step 2: Pair, could you tell me which two bodies you include?
Each pair in the pairs array is an object with references to the two bodies involved in the collision, bodyA and bodyB. I’ll extract those bodies:
for (let pair of event.pairs) {
let bodyA = pair.bodyA;
let bodyB = pair.bodyB;
}
Step 3: Bodies, could you tell me which particles you’re associated with?
Getting from the relevant Matter.js bodies to the Particle objects they’re associated with is a little harder. After all, Matter.js doesn’t know anything about my code. Sure, it’s doing all sorts of stuff to keep track of the relationships between bodies and constraints, but it’s up to me to manage my own objects and their associations with Matter.js elements. That said, every Matter.js body is instantiated with an empty object—{ }—called plugin, ready to store any custom data about that body. I can link the body to a custom object (in this case, a Particle) by storing a reference to that object in the plugin property.
Take a look at the updated constructor in the Particle class where the body is made. Note that the body-making procedure has been expanded by one line of code to add a particle property inside plugin. It’s important to make sure you’re adding a new property to the existing plugin object (in this case, plugin.particle = this) rather than overwriting the plugin object (for example, with plugin = this). The latter could interfere with other features or customizations.
class Particle {
constructor(x, y, radius) {
this.radius = radius;
this.body = Bodies.circle(x, y, this.radius);
this.body.plugin.particle = this;
this refers to this Particle object, telling the Matter.js Body to store a
reference to this particle that can be accessed later.
Composite.add(engine.world, this.body);
}
Later, in the handleCollision() callback function, that Particle object can be accessed from the Body via the plugin.
Example 6.10: Collision Events
function handleCollisions(event) {
for (let pair of event.pairs) {
let bodyA = pair.bodyA;
let bodyB = pair.bodyB;
    let particleA = bodyA.plugin.particle;
    let particleB = bodyB.plugin.particle;
Retrieve the particles associated with the colliding bodies via the plugin.
    if (particleA instanceof Particle && particleB instanceof Particle) {
      particleA.change();
      particleB.change();
    }
If they are both particles, change their color!
}
}
In most cases, you can’t assume that the objects that collided are all Particle objects. After all, the particle might have collided with a Boundary object (another kind of thing, depending on what’s in your world). You can check an object’s type with JavaScript’s instanceof operator, as I’ve done in this example.
Exercise 6.9
Create a simulation in which Particle objects disappear when they collide with one another. Where and how should you delete the particles? Can you have them shatter into smaller particles?
A Brief Interlude: Integration Methods
Has this ever happened to you? You’re at a fancy cocktail party, regaling your friends with tall tales of your incredible software physics simulations. Suddenly, out of the blue, someone pipes up: “Enchanting! But what integration method are you using?”
What?! you think to yourself. Integration?
Maybe you’ve heard the term before. Along with differentiation, it’s one of the two main operations in calculus. Oh right, calculus.
I’ve managed to get most of the way through this material related to physics simulation without really needing to dive into calculus. As I wrap up the first half of this book, however, it’s worth taking a moment to examine the calculus behind what I’ve been demonstrating and how it relates to the methodology in certain physics libraries (like Box2D, Matter.js, and the upcoming Toxiclibs.js). This way, you’ll know what to say at the next cocktail party when someone asks you about integration.
I’ll begin with a question: “What does integration have to do with position, velocity, and acceleration?” To answer, I should first define differentiation, the process of finding a derivative. The derivative of a function is a measure of how a function changes over time. Consider position and its derivative. Position is a point in space, while velocity is the change in position over time. Therefore, velocity can be described as the derivative of position. And what’s acceleration? The change in velocity over time. Acceleration is the derivative of velocity.
Integration, the process of finding an integral, is the inverse of differentiation. For example, the integral of an object’s velocity over time tells us the object’s new position when that time period ends. Position is the integral of velocity, and velocity is the integral of acceleration.
Since the physics simulations in this book are founded on the notion of calculating acceleration based on forces, integration is needed to figure out the object’s location after a certain period of time (like one cycle of the draw() loop). In other words, you’ve been doing integration all along!
velocity.add(acceleration);
position.add(velocity);
This methodology is known as Euler integration, or the Euler method (named for the mathematician Leonhard Euler, pronounced Oiler). It’s essentially the simplest form of integration and is very easy to implement in code—just two lines! However, while it’s computationally simple, it’s by no means the most accurate or stable choice for certain types of simulations.
Why is Euler inaccurate? Think about it this way: when you bounce down a sidewalk on a pogo stick, does the pogo stick sit in one position at time equals 1 second, then disappear and suddenly reappear in a new position at time equals 2 seconds, and do the same thing for 3 seconds, and 4, and 5? No, of course not. The pogo stick moves continuously through time.
But what’s happening in a p5.js sketch? A circle is at one position at frame 0, another at frame 1, another at frame 2, and so on. Sure, at 30 frames per second, you see the illusion of motion. But a new position is computed only every N units of time, whereas the real world is perfectly continuous. This results in some inaccuracies, as shown in Figure 6.12.


The “real world” is the smooth curve; the Euler simulation is the series of straight-line segments. One option to improve on Euler is to use smaller time steps—instead of once per frame, you could recalculate an object’s position 20 times per frame. But this isn’t practical; the sketch might then run too slowly.
I still believe that Euler is the best method for learning the basics, and it’s also perfectly adequate for most of the projects you might want to make with p5.js. Anything lost in efficiency or inaccuracy is made up for in ease of use and understandability. For better accuracy, for example, the Box2D engine uses symplectic Euler, or semi-explicit Euler, a slight modification of Euler. Other engines use an integration method called Runge-Kutta (named for German mathematicians Carl Runge and Martin Kutta).
Another popular integration method used in physics libraries, including both Matter.js and Toxiclibs.js, is Verlet integration. A simple way to describe Verlet integration is to think of the typical motion algorithm without explicitly storing velocity. After all, you don’t really need to store the velocity; if you always know where an object was at one point in time and where it is now, you can extrapolate its velocity. Verlet integration does precisely this, calculating velocity on the fly while the program is running, instead of maintaining a separate velocity variable.
Verlet integration is particularly well suited for particle systems, especially those with spring connections between the particles. Physics libraries hide the details from you so you don’t have to worry about how it all works, but if you’re interested in diving deeper into Verlet physics, I suggest reading the seminal paper on the topic, from which just about every Verlet computer graphics simulation is derived: “Advanced Character Physics” by Thomas Jakobsen.
Verlet Physics with Toxiclibs.js
Around 2005, Karsten Schmidt began work on Toxiclibs, a sweeping and pioneering open source library for computational design, specifically built for the Java version of Processing. Though it hasn��’t been actively maintained in more than 10 years, the concepts and techniques that the library demonstrated can be found in countless creative coding projects today. Its website described it as follows:
Toxiclibs is an independent, open source library collection for computational design tasks with Java and Processing developed by Karsten “toxi” Schmidt. The classes are purposefully kept fairly generic in order to maximize reuse in different contexts ranging from generative design, animation, interaction/interface design, data visualization to architecture and digital fabrication, use as teaching tool and more.
Schmidt continues to contribute to the creative coding field through his recent project, thi.ng umbrella. This work can be considered an indirect successor to Toxiclibs, but with a much greater scope and detail. If you like this book, you might especially enjoy exploring thi.ng vectors, which provides more than 800 vector algebra functions using plain-vanilla JavaScript arrays.
While thi.ng/umbrella may be a more modern and sophisticated approach, Toxiclibs remains a versatile tool, and I continue to use a version compatible with the latest version of Processing (4.3 as of the time of this writing). For this book, we should thank our lucky stars for Toxiclibs.js, a JavaScript adaptation of the library, created by Kyle Phillips (hapticdata). I’m going to cover only a few examples related to Verlet physics, but Toxiclibs.js includes a suite of other packages with functionality related to color, geometry, math, and more.
The examples I’m about to demonstrate could also be created using Matter.js, but I’ve decided to move to Toxiclibs.js for several reasons. The library holds a special place in my heart as a personal favorite, and it’s historically significant. I also believe that showing more than one physics library is important for providing a broader understanding of the tools and approaches available.
This switch from Matter.js to Toxiclibs.js raises an important question, though: How should you decide which library to use for a project? Matter.js, or Toxiclibs.js, or something else? If you fall into one of the following two categories, your decision is a bit easier:
- My project involves collisions. I have circles, squares, and other strangely shaped objects that knock each other around and bounce off each other. In this case, you’re going to want to use Matter.js, since Toxiclibs.js doesn’t handle rigid-body collisions.
- My project involves lots of particles flying around the screen. Sometimes they attract each other. Sometimes they repel each other. And sometimes they’re connected with springs. In this case, Toxiclibs.js is likely your best choice. It’s simpler to use in some ways than Matter.js and particularly well suited to connected systems of particles. It’s also high performance, because it gets to ignore all of the collision geometry.
Here’s a little chart that covers some of the features for each physics library:
| Feature | Matter.js | Toxiclibs.js |
|---|---|---|
| Rigid-body collisions | Yes | No |
| 3D physics | No | Yes |
| Particle attraction and repulsion forces | No | Yes |
| Spring connections (force based) | Yes | Yes |
| Constraints (general-purpose connections) | Yes | No |
All the documentation and downloads for the library files can be found at the Toxiclibs.js website. For the examples in this book, I’ll be working with a hosted CDN version of the library referenced in index.html, just as I demonstrated earlier for Matter.js. Here’s the <script> element to add:
<script src="https://cdn.jsdelivr.net/gh/hapticdata/toxiclibsjs@0.3.2/build/toxiclibs.js"></script>
My overview of Matter.js focused on a few key features of that library: world, vector, body, constraint. This has given you a head start on understanding Toxiclibs.js as well, since it follows a similar structure. The following table shows the corresponding Toxiclibs.js features:
| Matter.js | Toxiclibs.js |
|---|---|
|
|
|
|
|
|
|
|
I’ll discuss how some of these features translate to Toxiclibs.js before putting them together to create some interesting examples.
Vectors
Here we go again. Remember all that time spent learning the ins and outs of the p5.Vector class? Then remember how you had to revisit all those concepts with Matter.js and the Matter.Vector class? Well, it’s time to do it again, because Toxiclibs.js also includes its own vector classes. It has one for two dimensions and one for three: Vec2D and Vec3D. Both are found in the toxi.geom package and can be aliased in the same manner as Vector with Matter.js:
let { Vec2D, Vec3D } = toxi.geom;
Once again, Toxiclibs.js vectors are conceptually the same as the p5.js vectors we know and love, but they have their own style and syntax. Here’s an overview of how some of the basic vector math operations from p5.Vector translate to Vec2D (I’m sticking with 2D to match the rest of this book, but I encourage you to explore 3D vectors as well).
| p5.Vector | Vec2D |
|---|---|
|
|
|
|
|
|
Notice in particular that Toxiclibs.js vectors are created by calling the Vec2D constructor with the new keyword, rather than by using a factory method like Matter.Vector() or createVector().
The Physics World
The classes to describe the world and its particles and springs in Toxiclibs.js are found in toxi.physics2d. I’m also going to use a Rect object (to describe a generic rectangle boundary) and GravityBehavior to apply a global gravity force to the world. Including Vec2D, I now have all the following class aliases:
let { Vec2D, Rect } = toxi.geom;
The necessary geometry classes: vectors, rectangles
let { VerletPhysics2D, VerletParticle2D, VerletSpring2D } = toxi.physics2d;
Alias the important classes from toxi.physics2d.
let { GravityBehavior } = toxi.physics2d.behaviors;
For the world’s gravity
The first step is to create the world:
let physics;
function setup() {
physics = new VerletPhysics2D();
Create a Toxiclibs world.
Once I have the VerletPhysics world, I can set global properties. For example, if I want hard boundaries beyond which particles can’t travel, I can provide rectangular bounds:
physics.setWorldBounds(new Rect(0, 0, width, height));
In addition, I can add gravity with the GravityBehavior object. A gravity behavior requires a vector—how strong and in what direction is the gravity?
physics.addBehavior(new GravityBehavior(new Vec2D(0, 0.5)));
}
Finally, to calculate the physics of the world and move the world’s objects around, I have to call the world’s update() method. Typically, this would happen once per frame in draw():
function draw() {
physics.update();
This is the same as the Matter.js Engine.update().
}
Now all that remains is to populate the world.
Particles
The Toxiclibs.js equivalent of a Matter.js body—a thing that exists in the world and experiences physics—is a particle, as represented by the VerletParticle2D class. However, unlike Matter.js bodies, Toxiclibs.js particles don’t store geometry. They’re just points in space.
How should I integrate Toxiclibs.js particles into a p5.js sketch? In the Matter.js examples, I created my own class (called Particle) and included a reference to a Matter.js body:
class Particle {
constructor(x, y, r) {
this.body = Bodies.circle(x, y, r);
}
}
This technique was somewhat redundant, since Matter.js keeps track of the bodies in its world. However, it allowed me to manage which body is which (and therefore how each body should be drawn) without having to rely on iterating through Matter.js’s internal lists. I might take the same approach with Toxiclibs.js, making my own Particle class that stores a reference to a VerletParticle2D object. This way, I’ll be able to give the particles custom properties and draw them however I want. I’d probably write the code as follows:
class Particle {
constructor(x, y, r) {
this.particle = new VerletParticle2D(x, y);
A VerletParticle needs an initial (x, y) position, but it has no geometry, so the r is used only for drawing.
this.r = r;
}
show() {
fill(127);
stroke(0);
circle(this.particle.x, this.particle.y, this.r * 2);
When it comes time to draw the particle, the (x, y) is stored in this.particle.
}
}
Looking over this code, you might first notice that drawing the particle is as simple as grabbing the x and y properties and using them with circle(). Second, you might notice that this Particle class doesn’t do much beyond storing a reference to a VerletParticle2D object. This hints at something important. Think back to the discussion of inheritance in Chapter 4, and then ask yourself: What is a Particle object other than an augmented VerletParticle2D object? Why bother making two objects—a Particle and a VerletParticle2D—for every one particle in the world, when I could simply extend the VerletParticle2D class to include the extra code needed to draw the particle?
class Particle extends VerletParticle2D {
constructor(x, y, r) {
super(x, y);
Call super() with (x, y) so the object is initialized properly.
this.r = r;
Add a variable to track the radius.
}
show() {
Augment by adding a show() method.
fill(127);
stroke(0);
circle(this.x, this.y, this.r * 2);
x and y from VerletParticle2D!
}
}
Furthermore, at the risk of blowing your mind, it turns out that the VerletParticle2D class is a subclass of Vec2D. This means that in addition to inheriting everything from VerletParticle2D, the Particle class has inherited all theVec2D methods as well!
I can now create new particles:
let particle = new Particle(width / 2, height / 2, 8);
Just creating a particle isn’t enough, however. Just as in Matter.js, I have to explicitly add the new particle to the world. In Toxiclibs.js, this is done with the addParticle() method:
physics.addParticle(particle);
If you look at the Toxiclibs.js documentation, you’ll see that addParticle() expects a VerletParticle2D object. But I’ve passed it a Particle object. Does that work?
Yes! Remember one of the tenets of OOP: polymorphism. Here, because the Particle class extends VerletParticle2D, I can treat the particle in two ways: as a Particle or as a VerletParticle2D. This is an incredibly powerful feature of OOP. If you build custom classes that inherit from Toxiclibs.js classes, you can use the objects of those classes in conjunction with all the methods Toxiclibs.js has to offer.
Springs
In addition to the VerletParticle2D class, Toxiclibs.js has a set of classes that allow you to connect particles with spring forces. Toxiclibs.js has three types of springs:
VerletSpring2D: A springy connection between two particles. The spring’s properties can be configured in such a way as to create a stiff, stick-like connection or a highly elastic, stretchy connection. A particle can also be locked so that only one end of the spring can move.VerletConstrainedSpring2D: A spring whose maximum distance can be limited. This can help the whole spring system achieve better stability.VerletMinDistanceSpring2D: A spring that enforces its rest length only if the current distance is less than its rest length. This is handy if you want to ensure that objects are at least a certain distance from each other, but you don’t care if the distance is bigger than the enforced minimum.
Inheritance and polymorphism once again prove to be useful when making springs. A spring expects two VerletParticle2D objects when it’s created, but as before, two Particle objects will do, since Particle extends VerletParticle2D.
Here’s some example code to create a spring. This snippet assumes the existence of two particles, particle1 and particle2, and creates a connection between them with a given rest length and strength.
let length = 80;
What is the rest length of the spring?
let strength = 0.01;
How strong is the spring? (The higher the value, the more rigid the spring.)
let spring = new VerletSpring2D(particle1, particle2, length, strength);
Just as with particles, in order for the connection to be part of the physics world, it must be explicitly added to the world:
physics.addSpring(spring);
I have almost everything I need to build a simple first Toxiclibs.js example: two particles connected to form a springy pendulum. I want to add one more element, however: mouse interactivity.
With Matter.js, I explained that the physics simulation breaks down if you manually override a body’s position by setting it to the mouse. With Toxiclibs.js, this isn’t a problem. If I want to, I can set a particle’s (x, y) position manually. However, before doing so, it’s generally a good idea to call the particle’s lock() method, which fixes the particle in place. This is identical to setting the isStatic property to true in Matter.js.
The idea is to lock the particle temporarily so it stops responding to the world’s physics, alter its position, and then unlock it (with the unlock() method) so it can start moving again from its new location. For example, say I want to reposition a particle whenever the mouse is clicked:
if (mouseIsPressed) {
    particle1.lock();
    particle1.x = mouseX;
    particle1.y = mouseY;
    particle1.unlock();
First lock the particle, then set the x and y, then unlock() it.
}
And with that, I’m ready to put all these elements together in a simple sketch with two particles connected by a spring. One particle is permanently locked in place, and the other can be moved by dragging the mouse. This example is virtually identical to Example 3.11 from Chapter 3.
Example 6.11: Simple Spring with Toxiclibs.js
let { Vec2D, Rect } = toxi.geom;
let { VerletPhysics2D, VerletParticle2D, VerletSpring2D } = toxi.physics2d;
let { GravityBehavior } = toxi.physics2d.behaviors;
let physics;
let particle1, particle2;
function setup() {
createCanvas(640, 240);
  physics = new VerletPhysics2D();
  physics.setWorldBounds(new Rect(0, 0, width, height));
  physics.addBehavior(new GravityBehavior(new Vec2D(0, 0.5)));
Create a Toxiclibs.js Verlet physics world.
let length = 120;
What is the rest length of the spring?
  particle1 = new Particle(width / 2, 0, 8);
  particle2 = new Particle(width / 2 + length, 0, 8);
Create two particles.
particle1.lock();
Lock particle 1 in place.
let spring = new VerletSpring2D(particle1, particle2, length, 0.01);
Create one spring.
  physics.addParticle(particle1);
  physics.addParticle(particle2);
  physics.addSpring(spring);
Must add everything to the world
}
function draw() {
physics.update();
Must update the physics
background(255);
  stroke(0);
  line(particle1.x, particle1.y, particle2.x, particle2.y);
  particle1.show();
  particle2.show();
Draw everything.
  if (mouseIsPressed) {
    particle2.lock();
    particle2.x = mouseX;
    particle2.y = mouseY;
    particle2.unlock();
  }
Move the particle according to the mouse.
}
class Particle extends VerletParticle2D {
  constructor(x, y, r) {
    super(x, y);
    this.r = r;
  }

  show() {
    fill(127);
    stroke(0);
    circle(this.x, this.y, this.r * 2);
  }
How cute is this simple Particle class?
}
In this example, I’m continuing to visually represent the spring connecting the particles with a line. Keep in mind, however, that the behavior of the spring still exists, whether you choose to visually represent it or not. This can open up creative possibilities. For instance, you could decide to make the spring invisible or depict it in a completely different way, perhaps as a series of dots or a shape of your own invention.
Soft-Body Simulations

Verlet physics is particularly well suited for a genre of computer graphics known as soft-body simulation. Unlike the rigid-body simulations of Matter.js, in which hard-edged boxes crash into one another and retain their shapes, soft-body simulations involve objects that can deform and change shape with physics. Soft bodies allow for more flexible, fluid, and organic movements. They can stretch, squish, and jiggle in response to forces and collisions, and they appear . . . well, soft.
One of the first popular examples of soft-body physics was SodaConstructor, a game created in the early 2000s. Players could construct and animate custom 2D creatures built out of masses and springs. Other examples over the years have included games like LocoRoco, World of Goo, and more recently, JellyCar.
The basic building blocks of soft-body simulations are particles connected by springs—just like the pair particles in Example 6.11. Figure 6.13 shows how to configure a network of particle-spring connections to make various forms.


As the figure shows, a string can be simulated by connecting a line of particles with springs; a blanket can be simulated by connecting a grid of particles with springs; and a cute, cuddly, squishy cartoon character can be simulated with a custom layout of particles connected with springs. It’s not much of a leap from one to another.
A String
I’ll begin by simulating a soft pendulum—a bob hanging from a flexible string instead of a rigid arm. As it happens, Toxiclibs.js offers a convenient ParticleString2D class that creates a string of particles connected by springs in a single constructor call. However, for demonstration purposes, I’ll create my own particle string by using an array and a for loop. This way, you’ll gain a deeper understanding of the system, enabling you to create your own custom designs beyond a single string in the future.
First, I need an array of particles. I’ll use the same Particle class built in Example 6.11:
let particles = [];
Now, let’s say I want to have 20 particles, all spaced 10 pixels apart, as in Figure 6.14.


I can loop from i equals 0 all the way up to total, creating new particles and setting each one’s y position to i * 10. The first particle is at (0, 10), the second at (0, 20), the third at (0, 30), and so on:
for (let i = 0; i < total; i++) {
let particle = new Particle(i * length, 10, 4);
Space them out along the x-axis.
physics.addParticle(particle);
Add the particle to the physics world.
particles.push(particle);
Add the particle to the array.
}
Even though it’s redundant, I’m adding the particles to both the Toxiclibs.js physics world and the particles array. This will help me manage the sketch (especially when I might have more than one string of particles).
Now for the fun part: it’s time to connect all the particles. Particle index 0 will be connected to particle 1, particle 1 to particle 2, 2 to 3, 3 to 4, and so on (see Figure 6.15).


In other words, particle i needs to be connected to particle i+1 (except for when i represents the last element of the array):
for (let i = 0; i < total - 1; i++) {
The loop stops before the last element (total – 1).
let spring = new VerletSpring2D(particles[i], particles[i + 1], spacing, 0.01);
The spring connects particle i to i + 1.
physics.addSpring(spring);
The spring must also be added to the world.
}
Now, what if I want the string to hang from a fixed point? I can lock one of the particles—perhaps the first, the last, or the middle one. I’ll go with the first:
particles[0].lock();
Finally, I need to draw the particles. Instead of drawing them as circles, however, I want to treat them as points in a line. For that, I can use beginShape(), endShape(), and vertex(), accessing the individual particle positions from the array. I’ll use the show() method to draw only the last particle as a circle, creating a bob at the end of the string.
Example 6.12: Soft Swinging Pendulum
function draw() {
physics.update();
background(255);
stroke(0);
noFill();
beginShape();
for (let particle of particles) {
vertex(particle.x, particle.y);
Each particle represents one vertex in the string.
}
endShape();
particles[particles.length - 1].show();
This draws the last particle as a circle.
}
The full code available on the book’s website also demonstrates how to drag the bob particle with the mouse.
Exercise 6.10
Create a hanging cloth simulation using particles and springs. You’ll need to connect each particle with its vertical and horizontal neighbors.
A Soft-Body Character
Now that I’ve built a simple connected system—a single string of particles—I’ll expand on this idea to create a squishy, cute friend in p5.js, otherwise known as a soft-body character. The first step is to design a skeleton of connected particles. I’ll begin with a very simple design with only six vertices, as shown in Figure 6.16. Each vertex (drawn as a dot) represents a Particle object, and each connection (drawn as a line) represents a Spring object.


Creating the particles is the easy part; it’s exactly the same as before! I’d like to make one change, though. Rather than having the setup() function add the particles and springs to the physics world, I’ll incorporate this responsibility into the Particle constructor:
class Particle extends VerletParticle2D {
constructor(x, y, r) {
super(x, y);
this.r = r;
physics.addParticle(this);
Add the object to the global physics world. Inside a class, the object is referenced with this.
}
show() {
fill(127);
stroke(0);
circle(this.x, this.y, this.r * 2);
}
}
While it’s not strictly necessary, I’d also like to make a Spring class that inherits its functionality from VerletSpring2D. For this example, I want the resting length of the spring to always be equal to the distance between the skeleton’s particles when they’re first created. Additionally, I’m keeping the implementation simple here by hardcoding a uniform strength value of 0.01 in the Spring constructor. You may want to enhance the example with a more sophisticated design that sets varying degrees of springiness to the different parts of the soft-body character.
class Spring extends VerletSpring2D {
constructor(a, b) {
The constructor receives two particles as arguments.
let length = dist(a.x, a.y, b.x, b.y);
Calculate the rest length as the distance between the particles.
super(a, b, length, 0.01);
Hardcode the spring strength.
physics.addSpring(this);
Another enhancement to have the object add itself to the physics world!
}
}
Now that I have the Particle and Spring classes, I can assemble the character by adding a series of particles with hardcoded starting positions to a particles array, and a series of spring connections to a springs array.
let particles = [];
let springs = [];
Store all the particles and springs in arrays.
function setup() {
createCanvas(640, 240);
physics = new VerletPhysics2D();
  particles.push(new Particle(200, 25));
  particles.push(new Particle(400, 25));
  particles.push(new Particle(350, 125));
  particles.push(new Particle(400, 225));
  particles.push(new Particle(200, 225));
  particles.push(new Particle(250, 125));
Create the vertex positions of the character as particles.
  springs.push(new Spring(particles[0], particles[1]));
  springs.push(new Spring(particles[1], particles[2]));
  springs.push(new Spring(particles[2], particles[3]));
  springs.push(new Spring(particles[3], particles[4]));
  springs.push(new Spring(particles[4], particles[5]));
  springs.push(new Spring(particles[5], particles[0]));
Connect the vertices with springs.
}
The beauty of this system is that you can easily expand it to create your own design by adding more particles and springs! However, there’s one major issue here: I’ve made connections only around the perimeter of the character. If I were to apply a force (like gravity) to the body, it would instantly collapse onto itself. This is where additional internal springs come into play, as shown in Figure 6.17. They keep the character’s structure stable while still allowing it to move and squish in a realistic manner.

The final example incorporates the additional springs from Figure 6.17, a gravity force, and mouse interaction.
Example 6.13: Soft-Body Character
let physics;
let particles = [];
let springs = [];
function setup() {
createCanvas(640, 240);
physics = new VerletPhysics2D();
physics.setWorldBounds(new Rect(0, 0, width, height));
physics.addBehavior(new GravityBehavior(new Vec2D(0, 0.5)));
  particles.push(new Particle(200, 25));
  particles.push(new Particle(400, 25));
  particles.push(new Particle(350, 125));
  particles.push(new Particle(400, 225));
  particles.push(new Particle(200, 225));
  particles.push(new Particle(250, 125));
Particles at vertices of the character
  springs.push(new Spring(particles[0], particles[1]));
  springs.push(new Spring(particles[1], particles[2]));
  springs.push(new Spring(particles[2], particles[3]));
  springs.push(new Spring(particles[3], particles[4]));
  springs.push(new Spring(particles[4], particles[5]));
  springs.push(new Spring(particles[5], particles[0]));
Springs connecting vertices of the character
  springs.push(new Spring(particles[5], particles[2]));
  springs.push(new Spring(particles[0], particles[3]));
  springs.push(new Spring(particles[1], particles[4]));
Three internal springs!
}
function draw() {
background(255);
physics.update();
  fill(127);
  stroke(0);
  beginShape();
  for (let particle of particles) {
    vertex(particle.x, particle.y);
  }
  endShape(CLOSE);
Draw the character as one shape.
  if (mouseIsPressed) {
    particles[0].lock();
    particles[0].x = mouseX;
    particles[0].y = mouseY;
    particles[0].unlock();
  }
Mouse interaction
}
For the soft-body character example, you’ll notice that I’m no longer drawing all the elements of the physics simulation on the canvas! The show() method of the particles isn’t called, and the internal springs that give the character its structure are not rendered with lines. In fact, the springs themselves are never referenced after setup(), since the character’s shape is constructed from its particle positions. As such, the springs array isn’t strictly needed in this example, although I do find it useful to have, considering it may be necessary for enhancing the sketch in the future.
Considering the drawing as its own problem, distinct from the character’s skeletal structure, also opens up possibilities for adding other design elements such as eyes or antennae. These creative enhancements don’t need to be directly connected to the physics of the character, although they can be if you choose to do so!
Exercise 6.11
Design your own soft-body character with additional vertices and connections. What other design elements can you add? What other forces and interactions can you incorporate?
A Force-Directed Graph
Have you ever had the following thought? “I have a whole bunch of stuff I want to draw, and I want all that stuff to be spaced out evenly in a nice, neat, organized manner. Otherwise, I’ll have trouble sleeping at night.”
This isn’t an uncommon problem in computational design. One solution is a force-directed graph, a visualization of elements—let’s call them nodes—whose positions aren’t manually assigned. Instead, the nodes arrange themselves according to a set of forces. While any forces can be used, a classic approach uses spring forces: each node is connected to every other node with a spring, such that when the springs reach equilibrium, the nodes are evenly spaced (see Figure 6.18). Sounds like a job for Toxiclibs.js!
To create a force-directed graph, I’ll first need a class to describe an individual node in the system. Because the term node is associated with the JavaScript framework Node.js, I’ll stick with the term particle to avoid any confusion, and I’ll continue using my Particle class from the earlier soft-body examples.
Next, I’ll encapsulate a list of N particles into a new class called Cluster that represents the graph as a whole. The particles all start out near the center of the canvas:
class Cluster {
  constructor(n, length) {
    this.particles = [];
    for (let i = 0; i < n; i++) {
A cluster is initialized with N nodes.
      let x = width / 2 + random(-1, 1);
      let y = height / 2 + random(-1, 1);
      this.particles.push(new Particle(x, y, 4));
Here’s a funny little detail. The physics will misbehave if all the particles are created in exactly the same position.
}
}
Let’s assume that the Cluster class also has a show() method to draw all the particles in the cluster and that I’ll create a new Cluster object in setup() and render it in draw(). If I ran the sketch as is, nothing would happen. Why? Because I have yet to implement the whole force-directed graph part! I need to connect every single node to every other node with a spring. This is somewhat similar to creating a soft-body character, but rather than handcraft a skeleton, I want to write an algorithm to make all the connections automatically.
What exactly do I mean by that? Say I have five Particle objects: 0, 1, 2, 3, and 4. Figure 6.19 illustrates the connections.


Notice two important details about the list of connections:
- No particle is connected to itself. That is, 0 isn’t connected to 0, 1 isn’t connected to 1, and so on.
- Connections aren’t repeated in reverse. For example, if 0 is connected to 1, I don’t need to explicitly say that 1 is also connected to 0. I already know this, based on the definition of how a spring works!
How do I write the code to make these connections for N particles? Look at the four columns illustrated in Figure 6.19. They iterate all the connections starting from particles 0 up to 3. This tells me that I need to access each particle in the list from 0 to N – 1:
for (let i = 0; i < this.particles.length - 1; i++) {
let particle_i = this.particles[i];
Use the variable particle_i to store the particle reference.
Now look at the connections listed in Figure 6.19. I need to connect node 0 to nodes 1, 2, and 3. For node 1, I connect 2 and 3. For node 2, only 3. In general, for every node i, I need to iterate from i + 1 all the way until the end of the array. I’ll use the counter variable j for this purpose:
for (let j = i + 1; j < this.particles.length; j++) {
Look at how j starts at i + 1.
let particle_j = this.particles[j];
For every pair of particles i and j, I can then create a spring. I’ll go back to using VerletSpring2D directly, but you could also incorporate a custom Spring class:
physics.addSpring(new VerletSpring2D(particle_i, particle_j, length, 0.01));
The spring connects particles i and j.
}
}
Assuming those connections are made in the Cluster constructor, all that’s left is to create the cluster in setup() and call show() in the draw() loop!
Example 6.14: Cluster
let { VerletPhysics2D, VerletParticle2D, VerletSpring2D } = toxi.physics2d;
let physics;
let cluster;
function setup() {
createCanvas(640, 240);
physics = new VerletPhysics2D();
cluster = new Cluster(floor(random(2, 20)), random(10, height / 2));
Create a random cluster.
}
function draw() {
physics.update();
background(255);
cluster.show();
Draw the cluster.
}
This example illustrates a force-directed graph but does not involve any actual data! Here, the number of nodes in each cluster and the equilibrium length between the nodes are assigned randomly, and the spring strength has a constant value of 0.01. In a real-world application, these values could be determined based on your specific data, hopefully resulting in a meaningful visualization of the relationships within the data.
Exercise 6.12
Design a cluster-like structure as a skeleton for a cute, cuddly, squishy creature. Add gravity and mouse interaction.
Exercise 6.13
Expand the force-directed graph to have more than one Cluster object. Use a VerletMinDistanceSpring2D object to connect cluster to cluster. What kind of data might you visualize with this technique?
Attraction and Repulsion Behaviors
When it came time to create an attraction example for Matter.js, I showed how the Matter.Body class includes an applyForce() method. All I then needed to do was calculate the attraction force as a vector and apply it to the body. Similarly, the Toxiclibs.js VerletParticle2D class also includes a method called addForce() that can apply any calculated force to a particle.
However, Toxiclibs.js takes this idea one step further by offering built-in functionality for common forces (called behaviors) such as attraction! For example, if you add an AttractionBehavior object to a particular VerletParticle2D object, all other particles in the physics world will experience an attraction force toward that particle.
Say I create an instance of my Particle class (which extends the VerletParticle2D class):
let particle = new Particle(320, 120);
Now I can create an AttractionBehavior associated with that particle:
let distance = 20;
let strength = 0.1;
let behavior = new AttractionBehavior(particle, distance, strength);
Notice that the behavior is created with three arguments: a particle to assign it to, a distance, and a strength. The distance specifies the range within which the behavior will be applied. In this case, only particles within 20 pixels will experience the attraction force. The strength, of course, specifies how strong the force is.
Finally, in order for the force to be activated, the behavior needs to be added to the physics world:
physics.addBehavior(behavior);
Now everything that lives in the physics simulation will always be attracted to that particle, as long as it’s within the distance threshold.
The AttractionBehavior class is a very powerful tool. For example, even though Toxiclibs.js doesn’t automatically handle collisions like Matter.js does, you can create a collision-like simulation by adding an AttractionBehavior with a negative strength—a repulsive behavior—to each and every particle. If the force is strong and activated only within a short range (scaled to the particle’s radius), the result is much like a rigid-body collision. Here’s how to modify the Particle class to do this:
class Particle extends VerletParticle2D {
constructor(x, y, r) {
super(x, y);
this.r = r;
physics.addBehavior(new AttractionBehavior(this, r * 4, -1));
Every time a Particle is made, an AttractionBehavior is
generated and added to the physics world.
Note that when the strength
is negative, it’s a repulsive force!
}
show() {
fill(127);
stroke(0);
circle(this.x, this.y, this.r * 2);
}
}
I can now remake the attraction example from Chapter 2 with a single Attractor object that exerts an attraction behavior anywhere on the canvas. Even though the attractor is centered, I’m using a distance threshold of the full width to account for any movement of the attractor, and for particles located outside the canvas boundaries.
Example 6.15: Attraction (and Repulsion) Behaviors
class Attractor extends VerletParticle2D {
constructor(x, y, r) {
super(x, y);
this.r = r;
physics.addBehavior(new AttractionBehavior(this, width, 0.1));
Attract all particles always.
physics.addBehavior(new AttractionBehavior(this, this.r, -10));
Repel particles that come within its radius.
physics.addParticle(this);
A nice improvement where the attractor adds itself to the physics
}
show() {
fill(0);
circle(this.x, this.y, this.r * 2);
}
}
Just as discussed in “Spatial Subdivisions”, Toxiclibs.js projects with large numbers of particles interacting with one another can run very slowly because of the nature of the algorithm (every particle checking every other particle). To speed up the simulation, you could use the manual addForce() method in conjunction with a binning algorithm. Keep in mind, this would also require you to manually calculate the attraction force, as the built-in AttractionBehavior would no longer apply.
Exercise 6.14
Use AttractionBehavior in conjunction with spring forces.
The Ecosystem Project
Take your system of creatures from Chapter 5 and use a physics engine to drive their motion and behaviors. Here are some possibilities:
- Use Matter.js to allow collisions between creatures. Consider triggering an event when two creatures collide.
- Use Matter.js to augment the design of your creatures. Build a skeleton with distance joints or make appendages with revolute joints.
- Use Toxiclibs.js to augment the design of your creature. Use a chain of Toxiclibs.js particles for tentacles or a mesh of springs as a skeleton.
- Use Toxiclibs.js to add attraction and repulsion behaviors to your creatures.
- Use spring (or joint) connections between objects to control their interactions. Create and delete these springs on the fly. Consider making these connections visible or invisible to the viewer.

