Chapter 4: Particle Systems
That is wise. Were I to invoke logic, however,
logic clearly dictates that the needs of the
many outweigh the needs of the few.
—Spock


This early 20th-century photograph from a cloud chamber offers a glimpse into the world of subatomic particles, capturing the first ever observed positron. Cloud chambers are devices that make visible the paths of charged particles as they move through a supersaturated vapor.
In 1982, Lucasfilm researcher William T. Reeves was working on Star Trek II: The Wrath of Khan. Much of the movie revolves around the Genesis Device, a torpedo that, when shot at a barren, lifeless planet, has the ability to reorganize matter and create a habitable world for colonization. During the sequence, a wall of fire ripples over the planet while it’s being “terraformed.” The term particle system, an incredibly common and useful technique in computer graphics, was coined in the creation of this particular effect. As Reeves put it:
A particle system is a collection of many, many minute particles that together represent a fuzzy object. Over a period of time, particles are generated into a system, move and change from within the system, and die from the system.
Since the early 1980s, particle systems have been used in countless video games, animations, digital art pieces, and installations to model various irregular types of natural phenomena, such as fire, smoke, waterfalls, fog, grass, bubbles, and so on.
This chapter is dedicated to looking at strategies for coding a particle system and managing the associated data. How do you organize your code? Where do you store information related to individual particles versus information related to the system as a whole? The examples I’ll cover will use simple dots for the particles and apply only the most basic behaviors. However, these characteristics shouldn’t limit your imagination. Just because particle systems tend to look sparkly, fly forward, or fall with gravity doesn’t mean that yours should have those characteristics too. By building on this chapter’s framework and adding more creative ways to render the particles and compute their behavior, you can achieve a variety of effects.
In other words, the focus of this chapter is on how to keep track of a system of many elements. What those elements do and how they look is entirely up to you.
Why Particle Systems Matter

A particle system is a collection of independent objects, often represented by dots or other simple shapes. But why does this matter? Certainly, the prospect of modeling some of the phenomena listed (waterfalls!) is attractive and potentially useful. More broadly, though, as you start developing more sophisticated simulations, you’re likely to find yourself working with systems of many things—balls bouncing, birds flocking, ecosystems evolving, all sorts of things in plural. The particle system strategies discussed here will help you in all those situations.
In fact, just about every chapter from this one on includes sketches incorporating lists of objects, and that’s basically what a particle system is. Yes, I’ve already dipped my toe in the array waters in some of the previous chapters’ examples. But now it’s time to go where no array has gone before (in this book, anyway).
First, I want to accommodate flexible quantities of elements. Some examples may have zero things, sometimes one thing, sometimes ten things, and sometimes ten thousand things. Second, I want to take a more sophisticated, object-oriented approach. In addition to writing a class to describe a single particle, I want to write a class that describes the whole collection of particles—the particle system itself. The goal here is to be able to write a sketch that looks like this:
let system;
function setup() {
createCanvas(640, 360);
system = new ParticleSystem();
}
function draw() {
background(255);
system.run();
}
No single particle is referenced in this code, and yet the result will be full of particles flying all over the canvas. This works because the details are hidden inside the ParticleSystem class, which holds references to lots of instances of the Particle class. Getting used to this technique of writing sketches with multiple classes, including classes that keep lists of instances of other classes, will prove useful as you get to later chapters in this book.
Finally, working with particle systems is also an opportunity to tackle two other OOP techniques: inheritance and polymorphism. With the examples you’ve seen up until now, I’ve always used an array of a single type of object, like an array of movers or an array of oscillators. With inheritance and polymorphism, I’ll demonstrate a convenient way to use a single list to store objects of different types. This way, a particle system need not be a system of only one kind of particle.
A Single Particle
Before I can get rolling on coding the particle system, I need to write a class to describe a single particle. The good news: I’ve done this already! The Mover class from Chapter 2 serves as the perfect template. A particle is an independent body that moves about the canvas, so just like a mover, it has position, velocity, and acceleration variables; a constructor to initialize those variables; and methods to show() itself and update() its position.
class Particle {
  constructor(x, y) {
    this.position = createVector(x, y);
    this.acceleration = createVector(0, 0);
    this.velocity = createVector(0, 0);
  }
A Particle object is just another name for a mover. It has position, velocity, and acceleration.
update() {
this.velocity.add(this.acceleration);
this.position.add(this.velocity);
this.acceleration.mult(0);
}
show() {
stroke(0);
fill(175);
circle(this.position.x, this.position.y, 8);
}
}
This is about as simple as a particle can get. From here, I could take the particle in several directions. I could add the applyForce() method to affect the particle’s behavior (I’ll do precisely this in a future example). I could also add variables to describe color and shape, or load a p5.Image to draw the particle in a more interesting way. For now, however, I’ll focus on adding just one additional detail: life span.
Some particle systems involve an emitter that serves as the source of the particles. The emitter controls the initial settings for the particles: position, velocity, and more. It might emit a single burst of particles, a continuous stream of particles, or some variation thereof. The new feature here is that particles born at the emitter can’t live forever. If they did, the p5.js sketch would eventually grind to a halt as the particles add up to an unwieldy number over time. As new particles are born, old particles need to be removed, creating the illusion of an infinite stream of particles without hurting the performance of the sketch.
There are many ways to decide when a particle is ready to be removed. For example, it could “die” when it comes into contact with another object or when it leaves the frame of the canvas. For now, I’ll choose to give particles a lifespan variable that acts like a timer. It will start at 255 and count down to 0 as the sketch progresses, at which point the particle will be considered dead. Here’s the added code in the Particle class:
class Particle {
constructor(x, y) {
this.position = createVector(x, y);
this.acceleration = createVector(0, 0);
this.velocity = createVector(0, 0);
this.lifespan = 255;
A new variable to keep track of how long the particle has been “alive.” It starts at 255 and counts down to 0.
}
update() {
this.velocity.add(this.acceleration);
this.position.add(this.velocity);
this.lifespan -= 2.0;
Life span decreases.
}
show() {
    stroke(0, this.lifespan);
    fill(175, this.lifespan);
Since the life ranges from 255 to 0, it can also be used for alpha.
circle(this.position.x, this.position.y, 8);
}
}
With lifespan ranging from 255 to 0, it can conveniently double as the alpha transparency for the circle representing the particle. This way, when the particle is dead, it will have literally faded away.
With the addition of the lifespan property, I’ll need one more method, one that can be queried (for a true or false answer) to determine whether the particle is alive or dead. This will come in handy when I write a separate class to manage the list of particles. Writing this method is pretty easy: I just need to check whether the value of lifespan is less than 0. If it is, return true; otherwise, return false:
isDead() {
    if (this.lifespan < 0.0) {
      return true;
    } else {
      return false;
    }
Is the particle still alive?
}
Even more simply, I can just return the result of the Boolean expression!
isDead() {
return (this.lifespan < 0.0);
Is the particle still alive?
}
Before I get to the next step of making many particles, it’s worth taking a moment to confirm that the particle works correctly. For that, I’ll create a sketch featuring a single Particle object at a time. Here’s the full code, with a few small additions: giving the particle a random initial velocity, as well as adding applyForce() to simulate gravity.
Example 4.1: A Single Particle
let particle;
function setup() {
createCanvas(640, 360);
particle = new Particle(width / 2, 20);
}
function draw() {
background(255);
  particle.update();
  particle.show();
Operate the single particle.
  let gravity = createVector(0, 0.1);
  particle.applyForce(gravity);
Apply a gravity force.
  if (particle.isDead()) {
    particle = new Particle(width / 2, 20);
    console.log("Particle dead!");
  }
Check the particle’s state and make a new particle.
}
class Particle {
constructor(x,y) {
this.position = createVector(x, y);
this.velocity = createVector(random(-1, 1), random(-2, 0));
For demonstration purposes, the particle has a random velocity.
this.acceleration = createVector(0, 0);
this.lifespan = 255.0;
}
update() {
this.velocity.add(this.acceleration);
this.position.add(this.velocity);
this.lifespan -= 2.0;
this.acceleration.mult(0);
}
show() {
stroke(0, this.lifespan);
fill(0, this.lifespan);
circle(this.position.x, this.position.y, 8);
}
  applyForce(force) {
    this.acceleration.add(force);
  }
Keep the same physics model as in previous chapters.
  isDead() {
    return (this.lifespan < 0.0);
  }
Is the particle alive or dead?
}
This example creates only one particle at a time for the sake of simplicity and testing. Each time the particle reaches the end of its life span, the particle variable is overwritten with a new instance of the Particle class. This effectively replaces the previous Particle object. It’s important to understand that the previous Particle object isn’t so much deleted as it is no longer accessible or used within the code. The sketch essentially forgets the old particle and starts anew with the freshly created one.
Exercise 4.1
Create a run() method in the Particle class that handles update(), show(), and applyForce(). What are the pros and cons of this approach?
Exercise 4.2
Add angular velocity (rotation) to the particle, and design a particle that isn’t a circle so its rotation is visible.
An Array of Particles
Now that I have a class to describe a single particle, it’s time for the next big step: How can I keep track of many particles, without knowing in advance exactly how many I might have at any given time? The answer is the JavaScript array, a data structure that stores an arbitrarily long list of values. In JavaScript, an array is actually an object created from the Array class, and so it comes with many built-in methods. These methods supply all the functionality I need for maintaining a list of Particle objects, including adding particles, removing particles, or otherwise manipulating them. For a refresher on arrays, see the JavaScript array documentation on the MDN Web Docs website.
As I bring arrays into the picture, I’ll use a solution to Exercise 4.1 and assume a Particle.run() method that manages all of an individual particle’s functionality. While this approach also has some cons, it will keep the subsequent code examples more concise. To begin, I’ll use a for loop in setup() to populate an array with particles, then use another for loop in draw() to run each particle:
let total = 10;
let particles = [];
Start with an empty array.
function setup() {
  for (let i = 0; i < total; i++) {
    particles[i] = new Particle(width / 2, height / 2);
  }
This is what you’re probably used to—accessing elements on the array via an index and brackets: [i].
}
function draw() {
for (let i = 0; i < particles.length; i++) {
let particle = particles[i];
particle.run();
}
}
The for loop in draw() demonstrates how to call a method on every element of an array by accessing each index. I initialize a variable i to 0 and increment it by 1, accessing each element of the array until i hits particles.length and so reaches the end. As it happens, there are a few other ways to do the same thing. This is something that I both love and hate about coding in JavaScript—it has so many styles and options to consider. On the one hand, this makes JavaScript a highly flexible and adaptable language, but on the other hand, the abundance of choices can be overwhelming and lead to a lot of confusion when learning.
Let’s take a ride on the loop-de-loop roller coaster of choices for iterating over an array:
- The traditional
forloop, as just demonstrated. This is probably what you’re most used to, and it follows a similar syntax as other programming languages like Java and C. - The
for...inloop. This kind of loop allows you to iterate over all the properties of an object. It’s not particularly useful for arrays, so I won’t cover it here. - The
forEach()loop. This is a great one, and I encourage you to explore it! It’s an example of a higher-order function, something I’ll explain later in this chapter. - The
for...ofloop. This is the technique I’ll expand upon next. It provides a clean and concise syntax compared to the traditionalforloop when working with arrays of objects.
Here’s how the for...of loop looks:
function draw() {
for (let particle of particles) {
particle.run();
}
}
To translate this code, say each instead of let, and in instead of of. Putting it together, you get, “For each particle in particles, update and display that particle.”
Simple, elegant, concise, lovely. But before you get too excited about for...of loops, take a moment and breathe, because I have some bad news: they won’t work in every situation. Yes, I love for...of loops, and I’ll use them in some of the upcoming examples to iterate over the items in an array, but not just yet. Ultimately, I want to create a continuous stream of particles, with one new particle added to the array each cycle through draw() and old particles removed from the array as they die. As you’ll soon see, this is where the for...of loop lets me down.
Creating a new particle every frame is easy: I can just call the Array class’s push() method during draw() to add a new Particle object to the end of the array. This eliminates the need to create any particles during setup():
let particles = [];
function setup() {
createCanvas(640, 360);
}
function draw() {
background(255);
particles.push(new Particle(width / 2, 20));
A new Particle object is added to the array every cycle through draw().
for (let i = 0; i < particles.length; i++) {
particles[i].run();
}
}
Run this code for a few minutes and you’ll start to see the frame rate slow further and further until the program grinds to a halt. (My tests yielded horrific performance after 15 minutes.) The issue, of course, is that I’m adding more and more particles without removing any.
To fix this, I can use the splice() method to get rid of particles as they die. It removes one or more elements from an array starting from a given index. And this is why I can’t use a for...of loop here; splice() needs a reference to the index of the particle being removed, but for...of loops don’t provide such a reference. I’m stuck using a regular for loop instead:
for (let i = 0; i < particles.length; i++) {
let particle = particles[i];
Improve readability by assigning the array element to a variable.
particle.run();
if (particle.isDead()) {
particles.splice(i, 1);
Remove particle at index i.
}
}
Although this code will run just fine and never grind to a halt, I’ve opened up a medium-sized can of worms by trying to manipulate the contents of an array while iterating through that very same array. This is just asking for trouble. Take, for example, the following code:
for (let i = 0; i < particles.length; i++) {
let particle = particles[i];
particle.run();
particles.push(new Particle(width / 2, 20));
Add a new particle to the list while iterating.
}
This is a somewhat extreme scenario (with flawed logic), but it proves the point. For each particle in the list, this code adds a new particle to the list, and so the length of the array increases. This will result in an infinite loop, as I can never increment past the size of the array!
While removing elements from the array during a loop doesn’t cause the sketch to crash (as it would with adding), the problem is perhaps more insidious in that it leaves no evidence. To discover the flaw, I must first establish an important fact: when an element is removed from an array with splice(), all subsequent elements are shifted to the left. Figure 4.1 shows what happens when particle C (index 2) is removed. Particles A and B keep the same index, while particles D and E shift from 3 and 4 to 2 and 3, respectively.

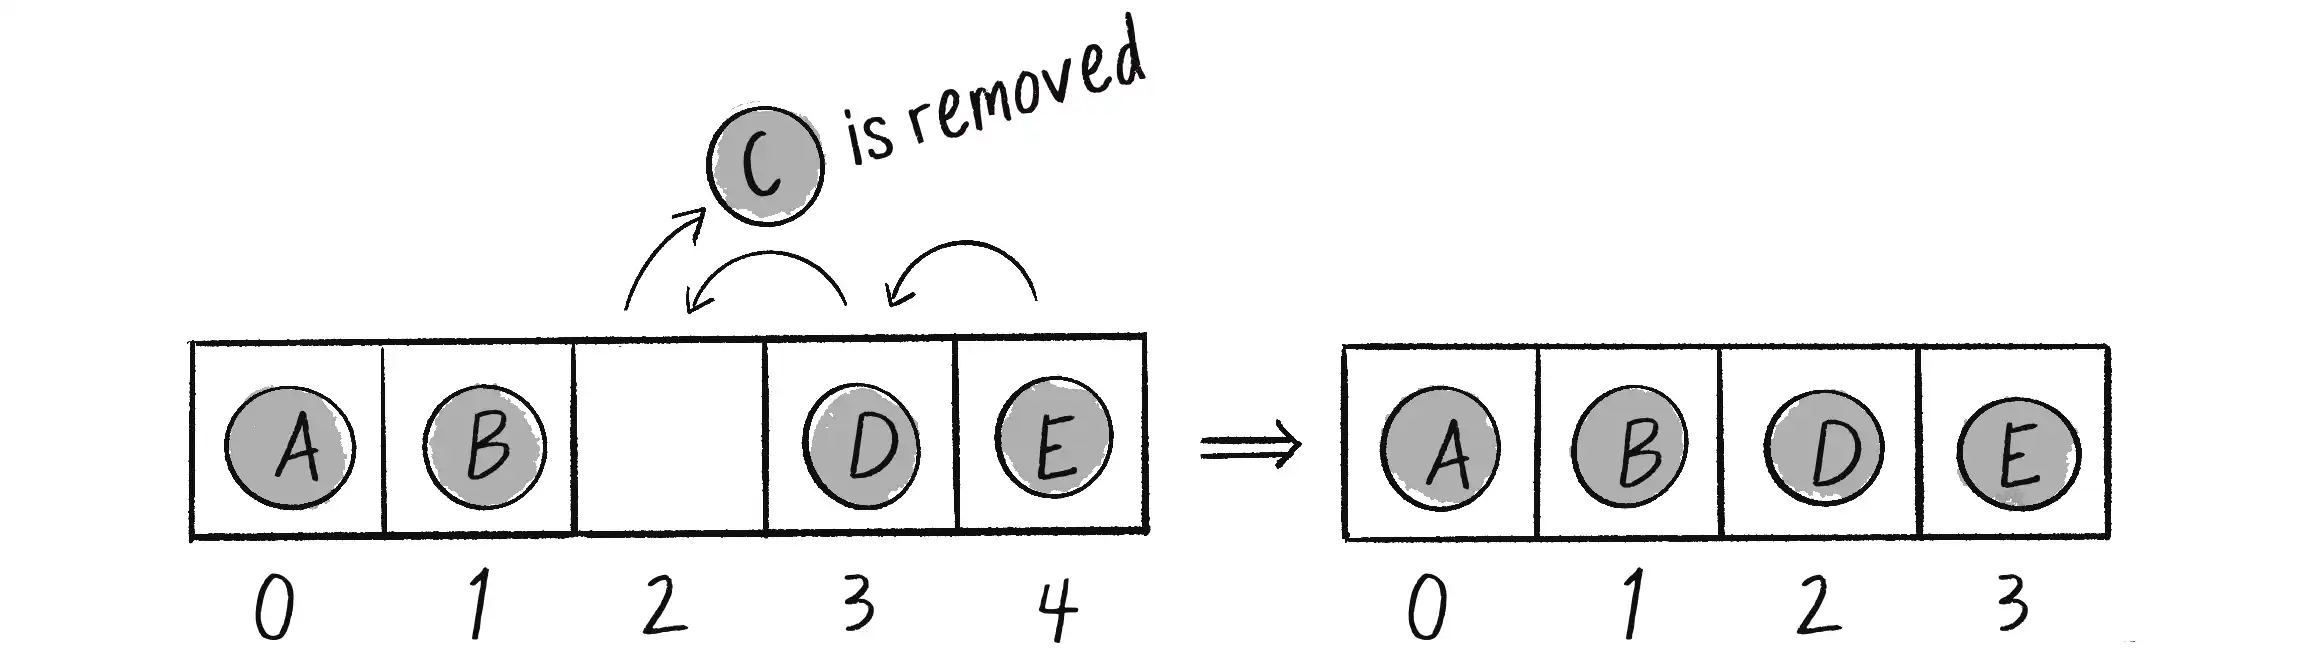
Consider what happens as counter i iterates over the elements of this array:
i | Particle | Action |
|---|---|---|
| 0 | Particle A | Don’t delete! |
| 1 | Particle B | Don’t delete! |
| 2 | Particle C | Delete! Slide particles D and E over from slots 3 and 4 to 2 and 3. |
| 3 | Particle E | Don’t delete! |
Notice the problem? Particle D is never checked! When C is deleted from slot 2, D moves into slot 2 in its place, but i has already moved on to slot 3. In practice, this may not be a total disaster, since particle D will get checked the next time around through draw(). Still, the expectation is that the code should iterate through every single element of the array. Skipping an element is unacceptable!
This problem has two solutions. The first is to iterate through the array backward. Since elements slide from right to left as other elements are removed, skipping an element becomes impossible. Here’s how the code looks:
for (let i = particles.length - 1; i >= 0; i--) {
Loop through the list backward.
let particle = particles[i];
particle.run();
if (particle.isDead()) {
particles.splice(i, 1);
}
}
A second solution is to use a higher-order function. This is a function that receives another function as an argument (or provides a function as its return value). JavaScript arrays use many higher-order functions. For example, a common one is sort(), which takes as its argument a function that defines how to compare two elements of the array and then sorts the array according to that comparison.
With the array of particles, I can use filter(). This higher-order function takes a function specifying some kind of condition as an argument, checks each item in an array for that condition, and returns only the item(s) for which the given condition is true (excluding those items that return false):
particles = particles.filter(function(particle) {
return !particle.isDead();
Keep particles that are not dead!
});
This is more commonly written using JavaScript’s arrow notation. To learn more, you can watch my Coding Train tutorial on higher-order functions and arrow notation.
particles = particles.filter(particle => !particle.isDead());
For the purposes of this book, I’m going to stick with the splice() method, but I encourage you to explore writing your code with higher-order functions and arrow notation.
Example 4.2: An Array of Particles
let particles = [];
function setup() {
createCanvas(640, 240);
}
function draw() {
background(255);
particles.push(new Particle(width / 2, 20));
for (let i = particles.length - 1; i >= 0; i--) {
Loop through the array backward for deletion.
let particle = particles[i];
particle.run();
if (particle.isDead()) {
particles.splice(i, 1);
}
}
}
You might be wondering why, instead of checking each particle individually, I don’t just remove the oldest particle after a certain period of time (determined by checking the frameCount or array length). In this example, where the particles die in the same order in which they’re born, that approach would actually work. I could even use a different array method called shift(), which automatically removes the first element of an array. However, in many particle systems, other conditions or interactions may cause “younger” particles to die sooner than “older” particles. Checking isDead() in combination with splice() is a nice, comprehensive solution that offers flexibility in managing particles across a variety of scenarios.
A Particle Emitter

I’ve conquered the array and used it to manage a list of Particle objects, with the ability to add and delete particles at will. I could stop here and rest on my laurels, but I can and should take an additional step: writing a class describing the list of Particle objects itself. At the start of this chapter, I used a speculative class name ParticleSystem to represent the overall collection of particles. However, a more fitting term for the functionality of emitting particles is Emitter, which I’ll use from now on.
The Emitter class will allow me to clean up the draw() function, removing the bulky logic of looping through all the particles. As an added bonus, it will also open up the possibility of having multiple particle emitters.
Recall that one of the goals I set at the beginning of this chapter was to write setup() and draw() without referencing any individual particles. In laying out that goal, I teased the possibility of a beautifully simple main sketch file. Here it is again, only now with the Emitter naming convention.
let emitter;
Just one particle emitter!
function setup() {
createCanvas(640, 360);
emitter = new Emitter();
}
function draw() {
background(255);
emitter.run();
}
To get to this point, look at each piece of setup() and draw() from Example 4.2 and think about how it can fit into the Emitter class instead. Nothing about the behavior of the code should change—the only difference is how it’s organized:
Array in setup() and draw() | Array in the Emitter Class |
|
|
I could also add new features to the particle system itself. For example, it might be useful for the Emitter class to keep track of an origin point where particles are born. The origin point could be initialized in the constructor.
Example 4.3: A Single Particle Emitter
class Emitter {
constructor(x, y) {
this.origin = createVector(x, y);
This particular particle system implementation includes an origin point where each particle begins.
this.particles = [];
}
addParticle() {
this.particles.push(new Particle(this.origin.x, this.origin.y));
The origin is passed to each particle when it’s added to the array.
}
}
The example emitter is a static source of particles, which is a nice way to begin working with particle systems. However, that’s not how it has to be. The emitter could have its own behaviors: experiencing physics, oscillating, reacting to user input, or exhibiting any other kind of motion demonstrated in previous chapters. The particles could then emanate from various positions over time, creating trails or other, more complex and intriguing patterns.
Exercise 4.3
What if the emitter moves? Can you emit particles from the mouse position, or use the concepts of velocity and acceleration to move the system autonomously?
Exercise 4.4
Building off Chapter 3’s Asteroids example, use a particle system to emit particles from the ship’s thrusters whenever a thrust force is applied. The particles’ initial velocity should be related to the ship’s current direction.
A System of Emitters
So far, I’ve described an individual particle and organized its code into a Particle class. I’ve also described a system of particles and organized the code into an Emitter class. This particle system is nothing more than a collection of independent Particle objects. But as an instance of the Emitter class, isn’t a particle system itself an object? If that’s the case (and it is), there’s no reason I couldn’t also build a collection of many particle emitters: a system of systems!
I could take this line of thinking even further, locking myself in a basement for days and sketching out a diagram of a system of systems of systems of systems of systems of systems . . . until I get this whole system thing out of my, well, system. After all, I could describe the world in a similar way: an organ is a system of cells, a human body is a system of organs, a neighborhood is a system of human bodies, a city is a system of neighborhoods, and so on and so forth. I’m not ready to go quite that far just yet, but it would still be useful to look at how to write a sketch that keeps track of many particle systems, each of which keeps track of many particles.
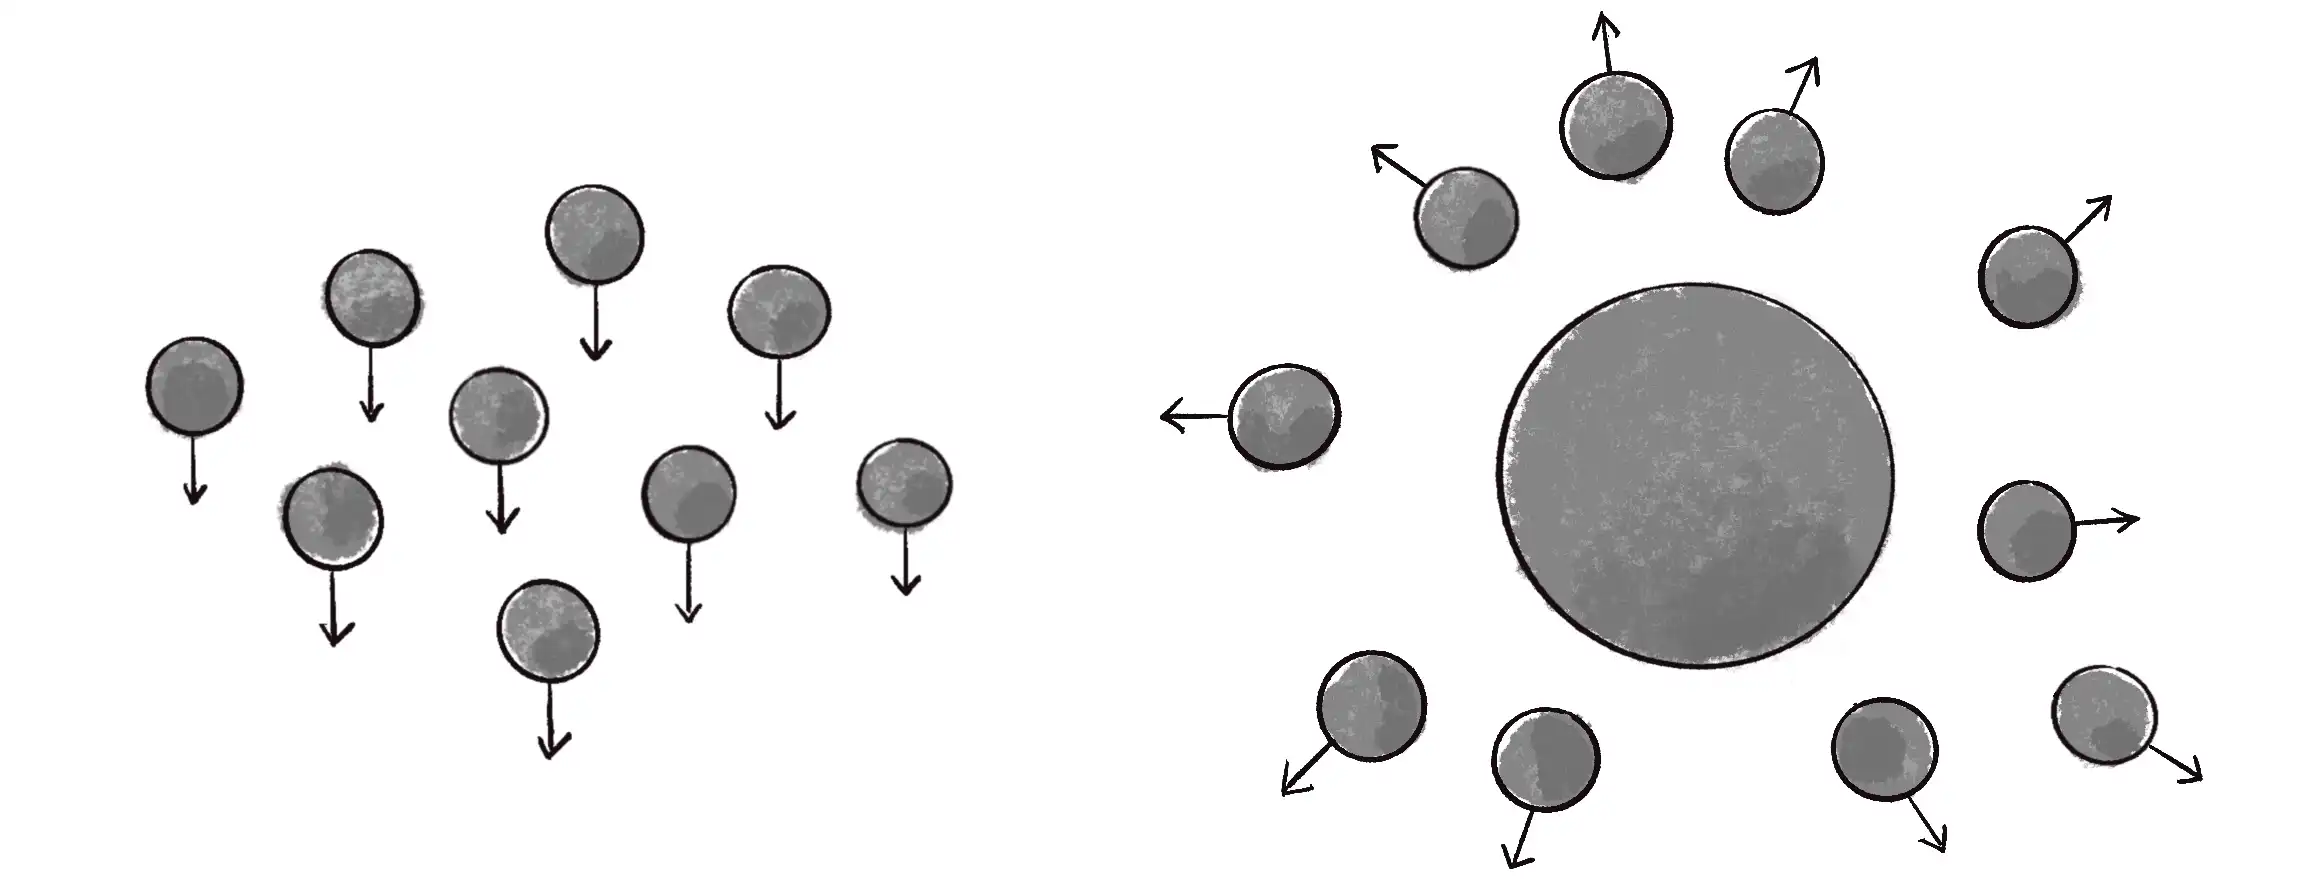
Consider this scenario: you start with a blank screen (Figure 4.2).
You click the mouse and generate a particle system at the mouse’s position (Figure 4.3).
You keep clicking the mouse. Each time, another particle system springs up where you clicked (Figure 4.4).
How to do this? In Example 4.3, I stored a single reference to an Emitter object in the variable emitter:
let emitter;
function setup() {
createCanvas(640, 240);
emitter = new Emitter(width / 2, 20);
}
function draw() {
background(255);
emitter.addParticle();
emitter.run();
}
Now I’ll call the variable emitters, plural, and make it an array so I can keep track of multiple Emitter objects. When the sketch begins, the array is empty.
Example 4.4: A System of Systems
let emitters = [];
This time, the type of thing you’re putting in the array is a particle emitter itself!
function setup() {
createCanvas(640, 240);
}
Whenever the mouse is clicked, a new Emitter object is created and placed into the array:
function mousePressed() {
emitters.push(new Emitter(mouseX, mouseY));
}
Then, in draw(), instead of referencing a single Emitter object, I now iterate over all the emitters and call run() on each of them:
function draw() {
background(255);
  for (let emitter of emitters) {
    emitter.run();
    emitter.addParticle();
  }
No emitters are removed, so a for...of loop can work here!
}
Notice that I’m back to using a for...of loop since no elements are being removed from the emitters array.
Exercise 4.5
Rewrite Example 4.4 so each particle system doesn’t live forever. Set a limit on the number of particles an individual system can generate. Then, when a particle system is empty (has no particles left), remove it from the emitters array.
Exercise 4.6
Create a simulation of an object shattering into many pieces. How can you turn one large shape into many small particles? Can you create several large shapes on the screen that each shatter when clicked?
Inheritance and Polymorphism

Up to now, all the particles in my systems have been identical, with the same basic appearance and behaviors. Who says this has to be the case? By harnessing two fundamental OOP principles, inheritance and polymorphism, I can create particle systems with significantly more variety and interest.
Perhaps you’ve encountered these two terms in your programming life before this book. For example, my beginner text, Learning Processing, has close to an entire chapter (Chapter 22) dedicated to them. Still, perhaps you’ve learned about inheritance and polymorphism only in the abstract and never had a reason to really use them. If that’s true, you’ve come to the right place. Without these techniques, your ability to program diverse particles and particle systems is extremely limited. (In Chapter 6, I’ll also demonstrate how understanding these topics will help you use physics libraries.)
Imagine it’s a Saturday morning. You’ve just gone out for a lovely jog, had a delicious bowl of cereal, and are sitting quietly at your computer with a cup of warm chamomile tea. It’s your old friend so-and-so’s birthday, and you’ve decided you’d like to make a greeting card with p5.js. How about simulating some confetti? Purple confetti, pink confetti, star-shaped confetti, square confetti, fast confetti, fluttery confetti—all kinds of confetti, all with different appearances and different behaviors, exploding onto the screen all at once.
What you have is clearly a particle system: a collection of individual pieces (particles) of confetti. You might be able to cleverly redesign the Particle class to have variables that store color, shape, behavior, and more. To create a variety of particles, you might initialize those variables with random values. But what if some of your particles are drastically different? It could become very messy to have all sorts of code for different ways of being a particle in the same class. Another option might be to do the following:
class HappyConfetti {
}
class FunConfetti {
}
class WackyConfetti {
}
This is a nice solution: create three classes to describe the different kinds of confetti that are part of your particle system. The Emitter constructor could then have some code to pick randomly from the three classes when filling the array (note that this probabilistic method is the same one I employed in the random walk examples in Chapter 0):
class Emitter {
constructor(num) {
this.particles = [];
for (let i = 0; i < num; i++) {
let r = random(1);
      if (r < 0.33) {
        this.particles.push(new HappyConfetti());
      } else if (r < 0.67) {
        this.particles.push(new FunConfetti());
      } else {
        this.particles.push(new WackyConfetti());
      }
Randomly pick a kind of particle.
}
}
Let me pause for a moment. You’ve done nothing wrong. All you wanted to do was wish your friend a happy birthday and enjoy writing some code. But while the reasoning behind this approach is quite sound, there’s a problem: Aren’t you going to be copying and pasting a lot of code between the confetti classes?
Yes, you probably will. Even though the kinds of particles are different enough to merit breaking them into separate classes, they’ll likely share a ton of code. For example, they’ll all have vectors to keep track of position, velocity, and acceleration; an update() function that implements the motion algorithm; and more.
This is where inheritance comes in. Inheritance allows you to write a class that takes on (inherits) variables and methods from another class, while also implementing its own custom features. You might also be wondering whether adding all those types of confetti to a single particles array actually works. After all, I don’t typically mix different kinds of objects in one array, as it could get confusing. How will the code in the Emitter class know which particle is which kind of confetti? Wouldn’t separate arrays be easier to manage?
constructor() {
this.happyParticles = [];
this.funParticles = [];
this.wackyParticles = [];
}
In fact, separating the particles into different arrays is inconvenient; a single array for all the particles in the system would be far more practical. Fortunately, the ability to mix objects of different types in one array is an inherent feature of JavaScript, and polymorphism allows the mixed objects to be operated on as if they were of the same type. I can populate an array with different kinds of particles, and each particle will still maintain its unique behaviors and characteristics as defined in its respective class.
In this section, I’ll illustrate inheritance and polymorphism in more detail, and then I’ll create a particle system that incorporates these concepts.
Inheritance Basics
To demonstrate how inheritance works, I’ll take an example from the world of animals: dogs, cats, monkeys, pandas, wombats, sea nettles, you name it. I’ll start by coding a Dog class. A Dog object will have an age variable (an integer), as well as eat(), sleep(), and bark() methods:
class Dog {
  constructor() {
    this.age = 0;
  }
eat() {
print("Yum!");
}
sleep() {
print("Zzzzzz");
}
bark() {
print("WOOF");
}
}
Now I’ll make a cat:
class Cat {
constructor() {
this.age = 0;
}
Dogs and cats have many of the same variables (age) and methods (eat, sleep).
eat() {
print("Yum!");
}
sleep() {
print("Zzzzzz");
}
  meow() {
    print("MEOW!");
  }
Cats have no bark(), but instead a unique function for meowing.
}
As I move on to rewriting the same code for fish, horses, koalas, and lemurs, this process will become rather tedious. A better solution is to develop a generic Animal class that can describe any type of animal. All animals eat and sleep, after all. I could then say this:
- A dog is an animal and has all the properties of animals and can do all the things animals do. Also, a dog can bark.
- A cat is an animal and has all the properties of animals and can do all the things animals do. Also, a cat can meow.
Inheritance makes this possible, allowing Dog and Cat to be designated as children (subclasses) of the Animal class. Children automatically inherit all variables and methods from the parent (superclass), but they can also include methods and variables not found in the parent. Like a phylogenetic tree of life, inheritance follows a tree structure (see Figure 4.5): dogs inherit from mammals, which inherit from animals, and so on.

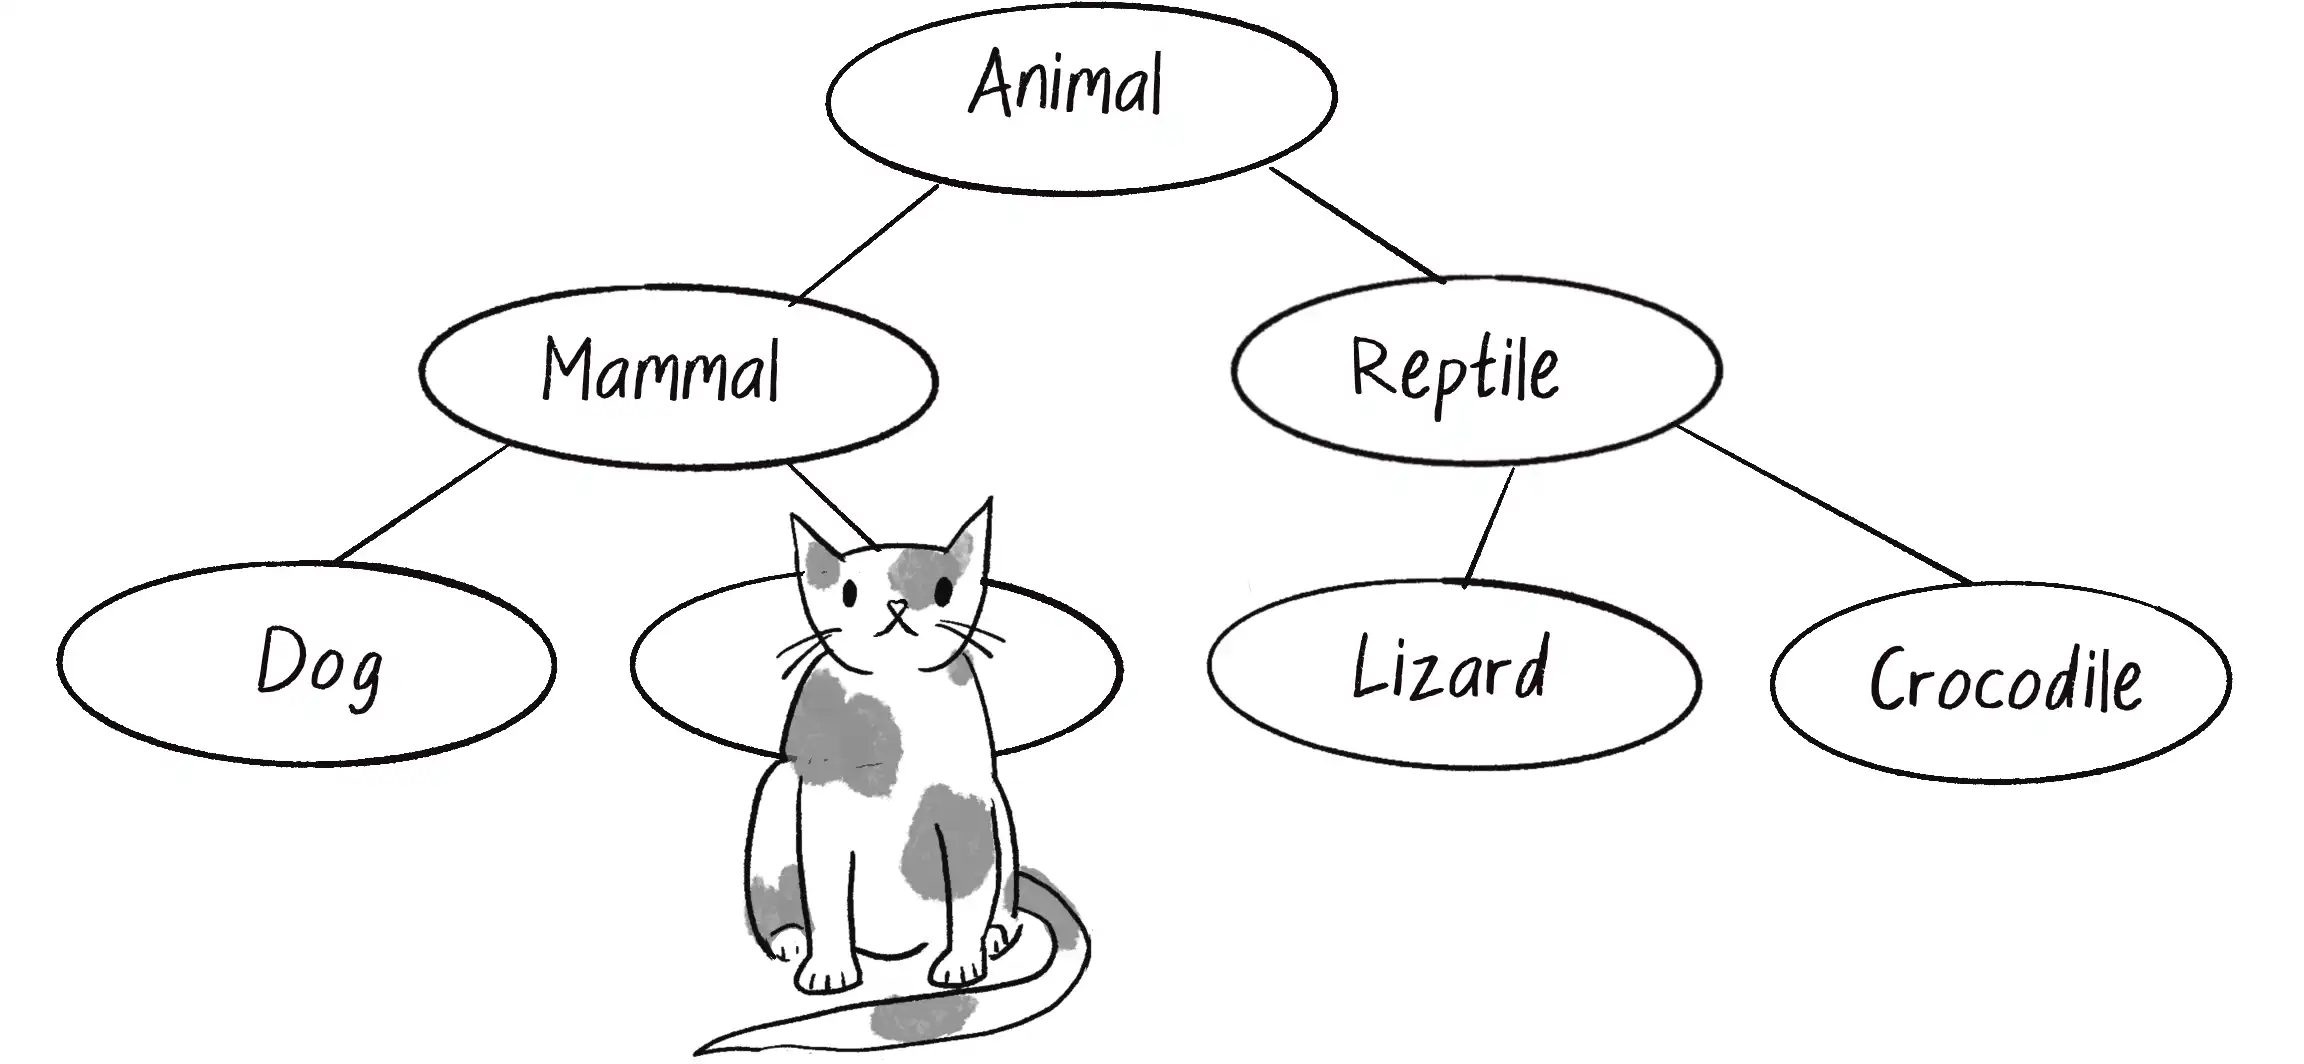
Here’s how the syntax of inheritance works:
class Animal {
The Animal class is the parent (or superclass).
constructor() {
this.age = 0;
Dog and Cat inherit the variable age.
}
  eat() {
    print("Yum!");
  }

  sleep() {
    print("Zzzzzz");
  }
Dog and Cat inherit the functions eat() and sleep().
}
class Dog extends Animal {
The Dog class is the child (or subclass), indicated by the code extends Animal.
constructor() {
super();
super() executes code found in the parent class.
}
  bark() {
    print("WOOF!");
  }
bark() is defined in the child class, since it isn’t part of the parent class.
}
class Cat extends Animal {
constructor() {
super();
}
meow() {
print("MEOW!");
}
}
This code uses two new JavaScript features. First, notice the extends keyword, which specifies a parent for the class being defined. A subclass can extend only one superclass. However, classes can extend classes that extend other classes; for example, Dog extends Animal, Terrier extends Dog. Everything is inherited all the way down the line from Animal to Terrier.
Second, notice the call to super() in the Dog and Cat constructors. This calls the constructor in the parent class. In other words, whatever you do in the parent constructor, do so in the child constructor as well. In this case, it isn’t necessary, but super() can also receive arguments if a parent constructor is defined that takes matching arguments.
You can expand a subclass to include additional methods beyond those contained in the superclass. Here I’ve added the bark() method to Dog and the meow() method to Cat. You can also include additional code, besides the call to super(), in a subclass’s constructor to give that subclass extra variables. For example, let’s assume that in addition to age, a Dog object should have a haircolor variable. The class would now look like this:
class Dog extends Animal {
constructor() {
super();
this.haircolor = color(210, 105, 30);
A child class can introduce new variables not included in the parent.
}
bark() {
print("WOOF!");
}
}
Note that the parent constructor is first called via super(), which sets age to 0, and then haircolor is set inside the Dog constructor.
If a Dog object eats differently than a generic Animal object, the parent method can be overridden by creating a different definition for the method inside the subclass:
class Dog extends Animal {
constructor() {
super();
this.haircolor = color(210, 105, 30);
}
eat() {
A child can override a parent method if necessary.
print("Woof! Woof! Slurp.")
A dog’s specific eating characteristics
}
bark() {
print("WOOF!");
}
}
But what if a dog eats mostly the same way as a generic animal, just with some extra functionality? A subclass can both run the code from its parent class’s method and incorporate custom code:
class Dog extends Animal {
constructor() {
super();
this.haircolor = color(210, 105, 30);
}
eat() {
super.eat();
Call eat() from Animal. A child can execute a function from the parent.
print("Woof!!!");
Additional code for a Dog object’s specific eating characteristics.
}
bark() {
print("WOOF!");
}
}
Similar to calling super() in the constructor, calling super.eat() inside the Dog class’s eat() method results in calling the Animal class’s eat() method. Then the subclass’s method definition can continue with any additional, custom code.
Polymorphism Basics
You’ve used inheritance to create a bunch of animal subclasses. Now try to imagine how your code would manage this diverse animal kingdom with dogs, cats, turtles, and kiwis all frolicking about:
let dogs = [];
let cats = [];
let turtles = [];
let kiwis = [];
Separate arrays for each animal
for (let i = 0; i < 10; i++) {
dogs.push(new Dog());
}
for (let i = 0; i < 15; i++) {
cats.push(new Cat());
}
for (let i = 0; i < 6; i++) {
turtles.push(new Turtle());
}
for (let i = 0; i < 98; i++) {
kiwis.push(new Kiwi());
}
As the day begins, the animals are all pretty hungry and looking to eat. It’s (enhanced!) looping time:
for (let dog of dogs) {
  dog.eat();
}
for (let cat of cats) {
  cat.eat();
}
for (let turtle of turtles) {
  turtle.eat();
}
for (let kiwi of kiwis) {
  kiwi.eat();
}
Separate loops for each animal
This works, but as the world expands to include many more animal species, you’ll be stuck writing a lot of individual loops. Is this really necessary? After all, the creatures are all animals, and they all like to eat. Why not have just one array and fill it with all kinds of animals?
let kingdom = [];
Just one array for all the animals!
for (let i = 0; i < 10; i++) {
kingdom.push(new Dog());
}
for (let i = 0; i < 15; i++) {
kingdom.push(new Cat());
}
for (let i = 0; i < 6; i++) {
kingdom.push(new Turtle());
}
for (let i = 0; i < 98; i++) {
kingdom.push(new Kiwi());
}
for (let animal of kingdom) {
  animal.eat();
}
One loop for all the animals!
This is polymorphism (from the Greek polymorphos, meaning “many forms”) in action. Although all the animals are grouped together in an array and processed in a single for loop, JavaScript can identify their true types and invoke the appropriate eat() method for each one. It’s that simple!
Particles with Inheritance and Polymorphism
Now that I’ve covered the theory and syntax behind inheritance and polymorphism, I’m ready to write a working example of them in p5.js, based on my Particle class. First, take another look at a basic Particle implementation, adapted from Example 4.1:
class Particle {
constructor(x, y) {
this.acceleration = createVector(0, 0);
this.velocity = createVector(random(-1, 1), random(-2, 0));
this.position = createVector(x, y);
this.lifespan = 255.0;
}
run() {
this.update();
this.show();
}
update() {
this.velocity.add(this.acceleration);
this.position.add(this.velocity);
this.lifespan -= 2.0;
this.acceleration.mult(0);
}
applyForce(force) {
this.acceleration.add(force);
}
isDead() {
return (this.lifespan < 0);
}
show() {
fill(0, this.lifespan);
circle(this.position.x, this.position.y, 8);
}
}
The class has variables and methods that any participant in a particle system should have. Next, I’ll create a Confetti subclass that extends Particle. It will use super() to execute the code from the parent class’s constructor and will inherit most of the Particle class’s methods as well. However, I’ll give Confetti its own show() method, overriding that of its parent, so Confetti objects will be drawn as squares rather than circles:
class Confetti extends Particle {
constructor(x, y) {
super(x, y);
/* I could add variables for only Confetti here. */
}
/* Other methods like update() are inherited from the parent. */
  show() {
    rectMode(CENTER);
    fill(0);
    square(this.position.x, this.position.y, 12);
  }
Override the show() method.
}
Let’s make this a bit more sophisticated. Say I want to have each Confetti particle rotate as it flies through the air. One option is to model angular velocity and acceleration, as described in Chapter 3. For ease, however, I’ll implement something less formal.
I know a particle has an x-position somewhere between 0 and the width of the canvas. What if I said that when the particle’s x-position is 0, its rotation should be 0; when its x-position is equal to the width, its rotation should be equal to ? Does this ring a bell? As discussed in Chapter 0, whenever a value has one range that you want to map to another range, you can use the map() function:
let angle = map(this.position.x, 0, width, 0, TWO_PI * 2);
Here’s how this code fits into the show() method:
show() {
let angle = map(this.position.x, 0, width, 0, TWO_PI * 2);
rectMode(CENTER);
fill(0, this.lifespan);
stroke(0, this.lifespan);
    push();
    translate(this.position.x, this.position.y);
    rotate(angle);
    rectMode(CENTER);
    square(0, 0, 12);
    pop();
To rotate() a shape in p5.js, transformations are necessary. For more, visit https://thecodingtrain.com/transformations.
}
The choice of might seem arbitrary, but it’s intentional—two full rotations add a significant degree of spin to the particle compared to just one.
Exercise 4.7
Instead of using map() to calculate angle, try modeling angular velocity and acceleration.
Now that I have a Confetti subclass that extends the base Particle class, the next step is to also add Confetti objects to the array of particles defined in the Emitter class.
Example 4.5: A Particle System with Inheritance and Polymorphism
class Emitter {
constructor(x, y) {
this.origin = createVector(x, y);
this.particles = [];
One list, for anything that is a Particle or extends Particle
}
addParticle() {
let r = random(1);
    if (r < 0.5) {
      this.particles.push(new Particle(this.origin.x, this.origin.y));
    } else {
      this.particles.push(new Confetti(this.origin.x, this.origin.y));
    }
A 50% chance of adding each kind of particle
}
run() {
for (let i = this.particles.length - 1; i >= 0; i--) {
let particle = this.particles[i];
particle.run();
if (particle.isDead()) {
this.particles.splice(i, 1);
}
}
}
}
Can you spot how this example is also taking advantage of polymorphism? It’s what allows the Particle and Confetti objects to commingle in the same particles array within the Emitter class. Thanks to the inheritance relationship, both can be considered the same type, Particle, and it’s safe to iterate through the array and call methods like run() and isDead() on each object. Together, inheritance and polymorphism enable a variety of particle types to be managed together in the one array, regardless of their original class.
Exercise 4.8
Create a particle system with more than two kinds of particles. Try varying the behavior of the particles in addition to the design.
Particle Systems with Forces
So far in this chapter, I’ve focused on structuring code in an object-oriented way to manage a collection of particles. While I did keep the applyForce() function in my Particle class, I took a couple of shortcuts to keep the code simple. Now I’ll add a mass property back in, changing the constructor() and applyForce() methods in the process (the rest of the class stays the same):
class Particle {
constructor(x, y) {
this.position = createVector(x, y);
this.velocity = createVector(random(-1, 1),random(-2, 0));
this.acceleration = createVector(0, 0);
Now start with acceleration of (0, 0).
this.lifespan = 255.0;
this.mass = 1;
Add a mass property. Try varying mass for different, interesting results!
}
applyForce(force) {
    let f = force.copy();
    f.div(this.mass);
Divide force by mass.
this.acceleration.add(f);
}
Now that the Particle class is complete, I have an important question to ask: Where should I call the applyForce() method? Where in the code is it appropriate to apply a force to a particle? In my view, there’s no right or wrong answer; it really depends on the exact functionality and goals of a particular p5.js sketch. My quick-and-dirty solution in the previous examples was to create and apply a gravity force in the run() method of each particle:
run() {
    let gravity = createVector(0, 0.05);
    this.applyForce(gravity);
Create a hardcoded vector and apply it as a force.
this.update();
this.show();
}
I’d like to now consider a broader, more generic solution that will allow different forces to be applied to individual particles in a system. For example, what if I were to apply a force globally every time through draw() to all particles globally?
function draw() {
background(255);
/* Apply a force to all particles? */
emitter.addParticle();
emitter.run();
}
Well, it seems there’s a small problem. The applyForce() method is written inside the Particle class, but there’s no reference to the individual particles themselves, only to emitter, the Emitter object. Since I want all particles to receive the force, however, I can pass the force to the emitter and let it manage all the individual particles:
function draw() {
background(255);
  let gravity = createVector(0, 0.1);
  emitter.applyForce(gravity);
Apply a force to the emitter.
emitter.addParticle();
emitter.run();
}
Of course, if I call an applyForce() method on the Emitter object in draw(), I then have to define that method in the Emitter class. In English, that method needs to be able to receive a force as a p5.Vector and apply that force to all the particles. Here’s the translation into code:
applyForce(force) {
    for (let particle of this.particles) {
      particle.applyForce(force);
    }
}
It almost seems silly to write this method. The code is essentially saying, “Apply a force to a particle system so that the system can apply that force to all the individual particles.” Although this may sound a bit roundabout, this approach is quite reasonable. After all, the emitter is in charge of managing the particles, so if you want to talk to the particles, you’ve got to talk to them through their manager. (Also, here’s a chance to use a for...of loop, since no particles are being deleted!)
Here’s the full example, including this change. (The code assumes the existence of the Particle class written earlier; there’s no need to show it again, since nothing has changed.)
Example 4.6: A Particle System with Forces
let emitter;
function setup() {
createCanvas(640, 240);
emitter = new Emitter(createVector(width / 2, 20));
}
function draw() {
background(255);
let gravity = createVector(0, 0.1);
emitter.applyForce(gravity);
Apply a force to all particles.
emitter.addParticle();
emitter.run();
}
class Emitter {
constructor(x, y) {
this.origin = createVector(x, y);
this.particles = [];
}
addParticle() {
this.particles.push(new Particle(this.origin.x, this.origin.y));
}
applyForce(force) {
for (let particle of this.particles) {
particle.applyForce(force);
}
Use a for...of loop to apply the force to all particles.
}
run() {
    for (let i = this.particles.length - 1; i >= 0; i--) {
      let particle = this.particles[i];
      particle.run();
      if (particle.isDead()) {
        this.particles.splice(i, 1);
      }
    }
You can’t use the enhanced loop because you’re checking for particles to delete.
}
}
While this example demonstrates a hardcoded gravity force, it’s worth considering how other forces from previous chapters, such as wind or drag, could come into play. You could also experiment with varying how and when forces are applied. Instead of a force acting on particles continuously every frame, what if a force only kicked in under certain conditions or at specific moments? A lot of room remains here for creativity and interactivity in the way you design your particle systems!
Particle Systems with Repellers
What if I want to take my code one step further and add a Repeller object—the inverse of the Attractor object covered in Chapter 2—that pushes away any particles that get too close? This requires a bit more sophistication than uniformly applying the gravity force, because the force the repeller exerts on a particular particle is unique and must be calculated separately for each particle (see Figure 4.6).

To incorporate a new Repeller object into a particle system sketch, I’m going to need two major additions to the code:
- A
Repellerobject (declared, initialized, and displayed) - A method that passes the
Repellerobject into the particle emitter so that the repeller can apply a force to each particle object
let emitter;
let repeller;
New thing: we declare a Repeller object.
function setup() {
createCanvas(640, 240);
emitter = new Emitter(width / 2, 50);
repeller = new Repeller(width / 2 - 20, height / 2);
New thing: we initialize a Repeller object.
}
function draw() {
background(255);
emitter.addParticle();
let gravity = createVector(0, 0.1);
emitter.applyForce(gravity);
emitter.applyRepeller(repeller);
New thing: a method to apply a force from a repeller
emitter.run();
repeller.show();
New thing: display the Repeller object.
}
Creating a Repeller object is easy; it’s a duplicate of the Attractor class from Example 2.6. Since this chapter doesn’t involve the concept of mass, I’ll add a property called power to the Repeller. This property can be used to adjust the strength of the repellent force:
class Repeller {
constructor(x, y) {
this.position = createVector(x, y);
A Repeller doesn’t move, so you just need position.
this.power = 150;
Instead of mass, use the concept of power to scale the repellent force.
}
show() {
stroke(0);
fill(127);
circle(this.position.x, this.position.y, 32);
}
}
The more difficult task is writing the applyRepeller() method. Instead of passing a p5.Vector object as an argument, as with applyForce(), I need to pass a Repeller object into applyRepeller() and ask that method to do the work of calculating the force between the repeller and each particle. Take a look at both of these methods side by side:
|
|
These nearly identical methods have only two differences. I mentioned one of them before: the argument to applyRepeller() is a Repeller object, not a p5.Vector object. The second difference is the more important one: I must calculate a custom p5.Vector force for each and every particle and apply that force. How is that force calculated? In a Repeller class method called repel(), it is calculated as the inverse of the attract() method from the Attractor class:
repel(particle) {
All the same steps to calculate an attractive force, only pointing in the opposite direction
let force = p5.Vector.sub(this.position, particle.position);
Step 1: Get the force direction.
    let distance = force.mag();
    distance = constrain(distance, 5, 50);
Step 2: Get and constrain the distance.
let strength = -1 * this.power / (distance * distance);
Step 3: Calculate the magnitude, using a power variable for G.
    force.setMag(strength);
    return force;
Step 4: Make a vector out of the direction and magnitude.
}
Notice that throughout this entire process of adding a repeller to the environment, I never once considered editing the Particle class itself. A particle doesn’t have to know anything about the details of its environment; it simply needs to manage its position, velocity, and acceleration, as well as have the ability to receive an external force and act on it.
I’m now ready to write this example in its entirety, again leaving out the Particle class, which hasn’t changed.
Example 4.7: A Particle System with a Repeller
let emitter;
One particle emitter
let repeller;
One repeller
function setup() {
createCanvas(640, 240);
emitter = new Emitter(width / 2, 20);
repeller = new Repeller(width / 2, 200);
}
function draw() {
background(255);
emitter.addParticle();
  let gravity = createVector(0, 0.1);
  emitter.applyForce(gravity);
Apply a universal gravity.
emitter.applyRepeller(repeller);
Apply the repeller.
emitter.run();
repeller.show();
}
class Emitter {
The emitter manages all the particles.
constructor(x, y) {
this.origin = createVector(x, y);
this.particles = [];
}
addParticle() {
this.particles.push(new Particle(this.origin.x, this.origin.y));
}
applyForce(force) {
    for (let particle of this.particles) {
      particle.applyForce(force);
    }
Apply a force as a p5.Vector.
}
applyRepeller(repeller) {
    for (let particle of this.particles) {
      let force = repeller.repel(particle);
      particle.applyForce(force);
    }
Calculate a force for each particle based on a repeller.
}
run() {
for (let i = this.particles.length - 1; i >= 0; i--) {
let particle = this.particles[i];
particle.run();
if (particle.isDead()) {
this.particles.splice(i, 1);
}
}
}
}
class Repeller {
constructor(x, y) {
this.position = createVector(x, y);
this.power = 150;
How strong is the repeller?
}
show() {
stroke(0);
fill(127);
circle(this.position.x, this.position.y, 32);
}
repel(particle) {
    let force = p5.Vector.sub(this.position, particle.position);
    let distance = force.mag();
    distance = constrain(distance, 5, 50);
    let strength = -1 * this.power / (distance * distance);
    force.setMag(strength);
    return force;
This is the same repel algorithm from Chapter 2: forces based on gravitational attraction.
}
}
Notice the addition of the power variable in the Repeller class, which controls the strength of the repulsion force exerted. This property becomes especially interesting when you have multiple attractors and repellers, each with different power values. For example, strong attractors and weak repellers might result in particles clustering around the attractors, while more powerful repellers might reveal patterns reminiscent of paths or channels between them. These are hints of what’s to come in Chapter 5, where I’ll further explore the concept of a complex system.
Exercise 4.9
Expand Example 4.7 to include multiple repellers and attractors. How might you use inheritance and polymorphism to create separate Repeller and Attractor classes without duplicating code?
Exercise 4.10
Create a particle system in which each particle responds to every other particle. (I’ll explain how to do this in detail in Chapter 5.)
Image Textures and Additive Blending

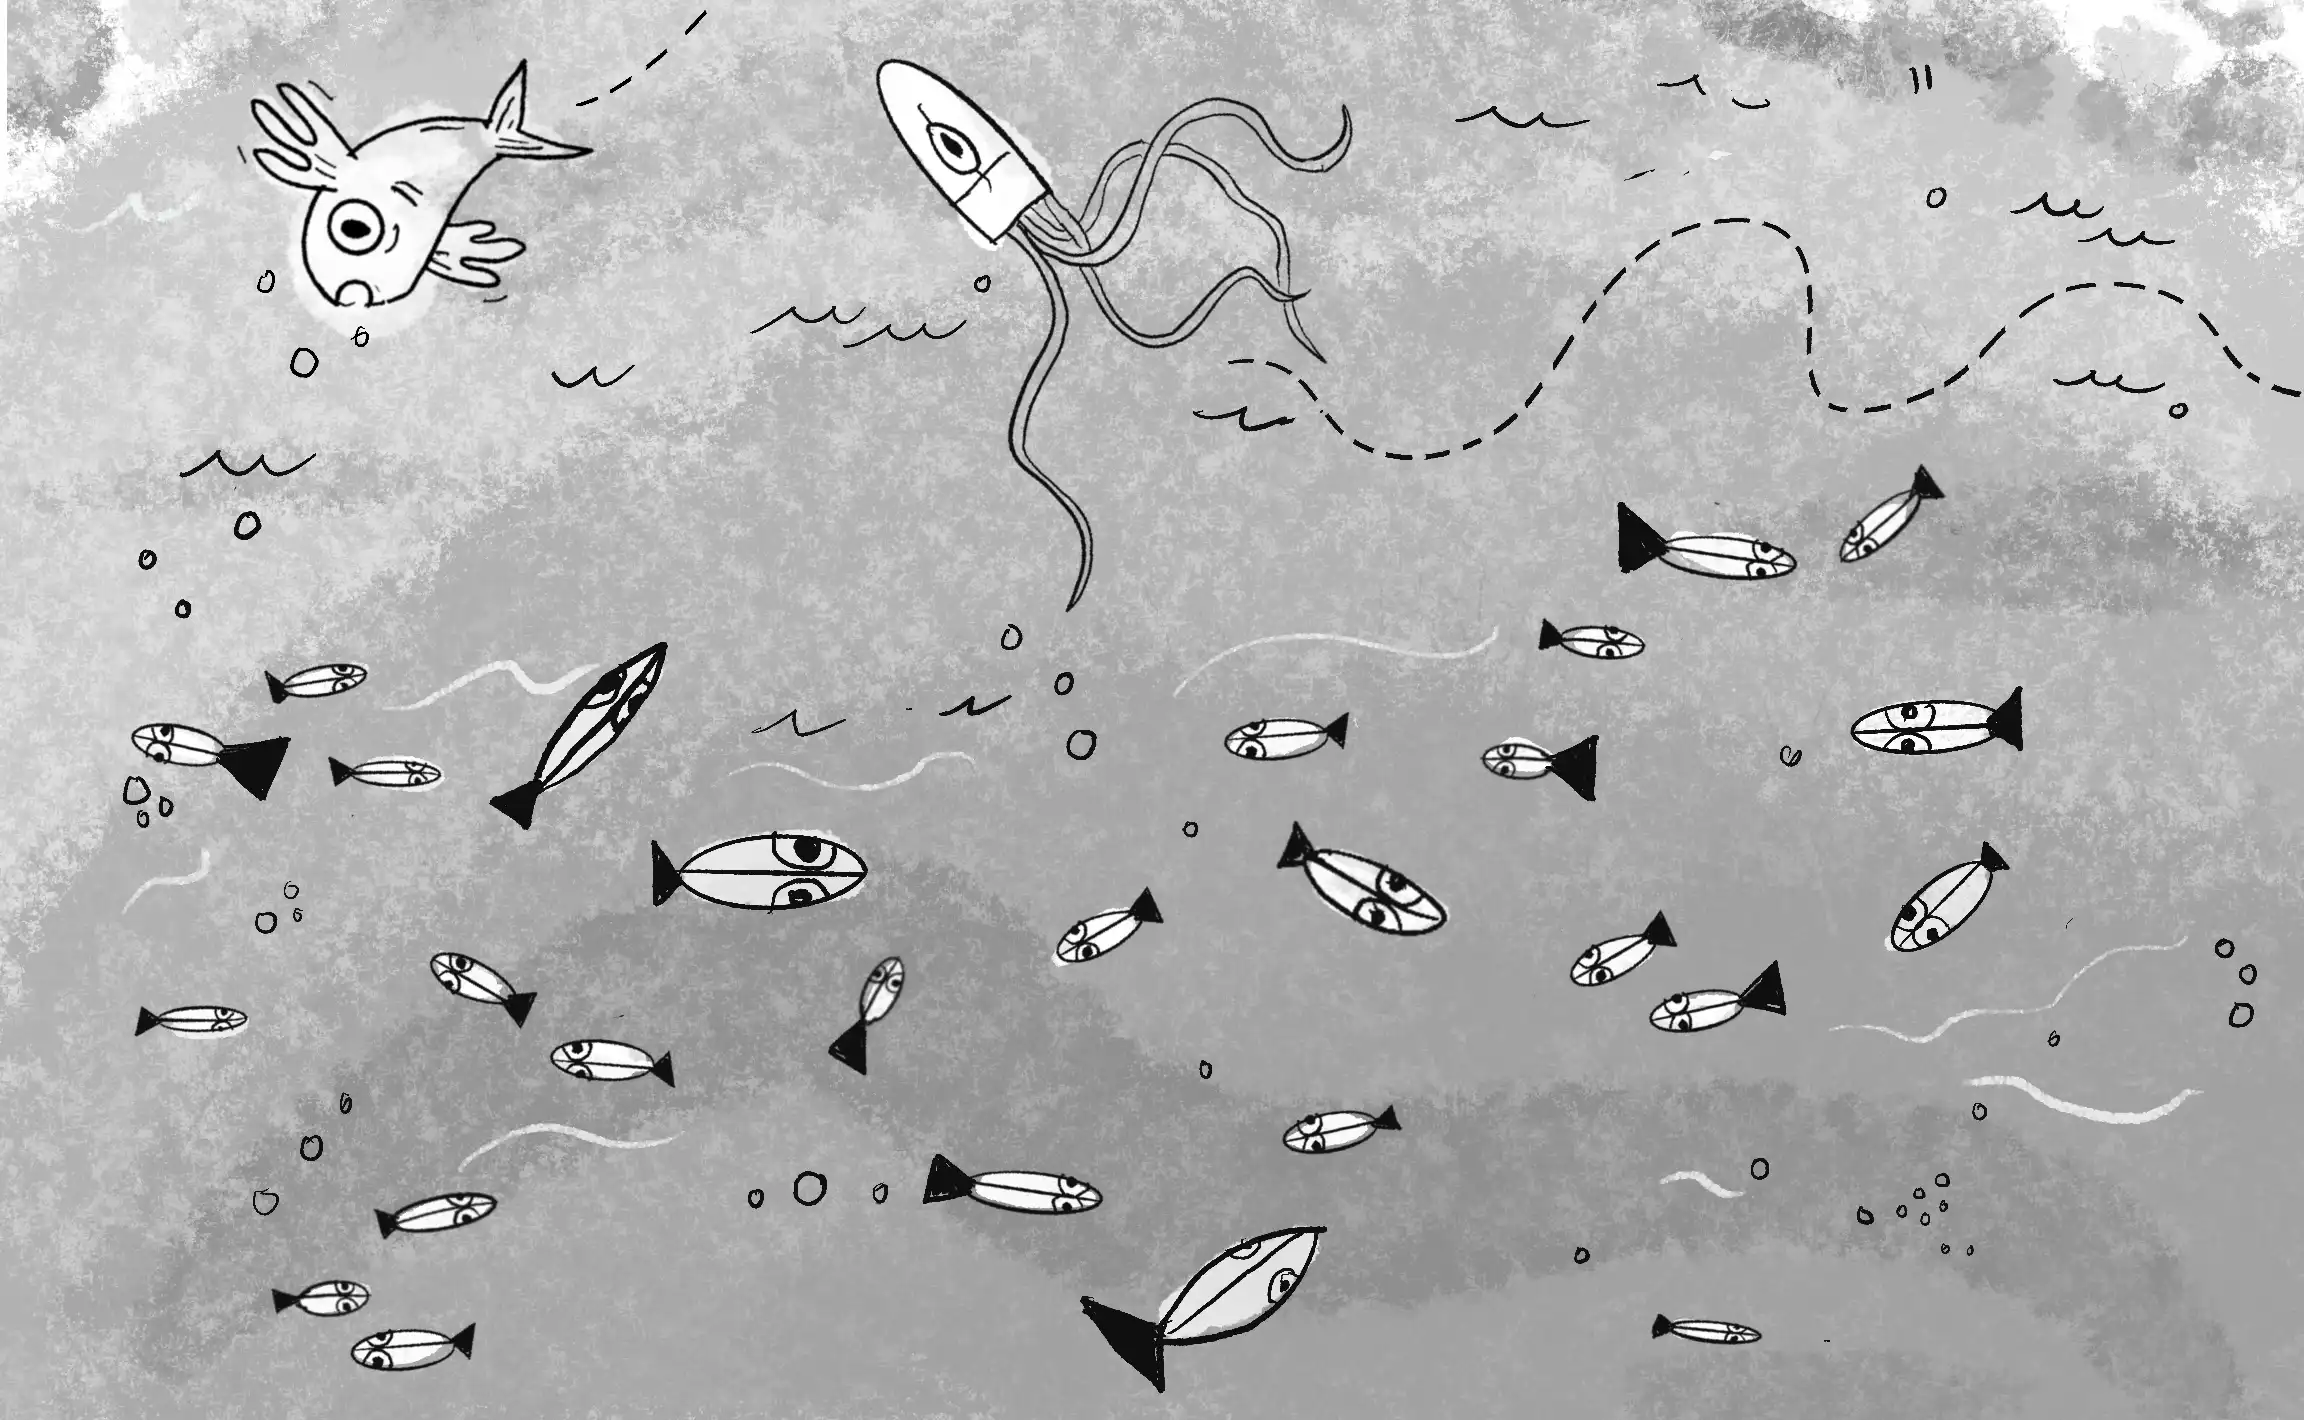
Even though this book is almost exclusively focused on behaviors and algorithms rather than computer graphics and design, I don’t think I would be able to live with myself if I finished a discussion of particle systems without presenting an example of texturing each particle with an image. After all, the way you render a particle is a key piece of the puzzle in designing certain types of visual effects. For example, compare the two smoke simulations shown in Figure 4.7.
Both images were generated from identical algorithms. The only difference is that each particle is drawn as a plain white circle in the image on the left, whereas each particle is drawn as a fuzzy blob in the image on the right. Figure 4.8 shows the two kinds of particle textures.


Using an image to texture your particles can give you a lot of bang for very little buck in terms of the realism of the visual effect. Before you write any code, however, you have to make your image texture. I recommend using the PNG format, as p5.js will retain the alpha channel (transparency) when drawing the image, which is needed for blending the texture as particles are layered on top of one another. You can create these textures in numerous ways: you can indeed make them programmatically within p5.js (here’s one example!), but you can also use other open source or commercial graphics editing tools.
Once you’ve made a PNG and deposited it in your sketch’s data folder, you need only a few extra lines of code.
Example 4.8: An Image-Texture Particle System
First, declare a variable to store the image:
let img;
Then, load the image in preload():
function preload() {
img = loadImage("texture.png");
Load the PNG.
}
Next, when it comes time to draw the particle, use the img variable instead of drawing a circle or rectangle:
show() {
imageMode(CENTER);
tint(255, this.lifespan);
Note that tint() is the image equivalent of a shape’s fill().
image(img, this.position.x, this.position.y);
}
This smoke example is also a nice excuse to revisit the Gaussian distributions from “A Normal Distribution of Random Numbers”. Instead of launching the particles in a purely random direction, which produces a fountain-like effect, the result will appear more smokelike if the initial velocity vectors cluster mostly around a mean value, with a lower probability of outlying velocities.
Using the randomGaussian() function, the particle velocities can be initialized as follows:
let vx = randomGaussian(0, 0.3);
let vy = randomGaussian(-1, 0.3);
this.velocity = createVector(vx, vy);
Finally, in this example I’ve applied a wind force to the smoke, mapped from the mouse’s horizontal position:
function draw() {
background(0);
  let dx = map(mouseX, 0, width, -0.2, 0.2);
  let wind = createVector(dx, 0);
The wind force direction is based on mouseX.
emitter.applyForce(wind);
emitter.run();
emitter.addParticle();
}
In addition to designing the texture, you should consider its resolution. Rendering a large number of high-resolution textures can significantly impair performance, especially if the code has to resize them dynamically. The ideal scenario for optimal speed is to size the texture precisely to the resolution you intend to draw the particles in the canvas. If you want particles of varying sizes, then ideally you should create the texture at the maximum size of any particle.
Exercise 4.11
Try creating other textures for different types of effects. Can you make your particle system look like fire instead of smoke?
Exercise 4.12
Use an array of images and assign each Particle object a different image. Multiple particles will be drawing the same image, so make sure you don’t call loadImage() any more than you need to. (Once for each image file is enough!)
Finally, it’s worth noting that many algorithms can be used to blend colors in computer graphics. These are often referred to as blend modes. Normally, when you draw something on top of something else in p5.js, you see only the top layer—this is the default “blend” behavior of not blending at all. Meanwhile, when pixels have alpha transparency values (as they do in the smoke example), p5.js automatically uses an alpha compositing algorithm that combines a percentage of the background pixels with the new foreground pixels, based on those alpha values themselves.
However, drawing with other blend modes is possible. For example, a much-loved technique for particle systems is additive blending. This mode was pioneered by Robert Hodgin in his classic particle system and forces exploration, Magnetosphere, which later became the visualizer for early versions of iTunes, displaying sound-responsive, animated visuals.
Additive blending is a simple blend algorithm that adds the pixel values of one layer to another, capping all values at 255. This results in a space-age glow effect, with the colors getting brighter and brighter as more layers are added together.
Example 4.9: Additive Blending
Before you start drawing anything, set the blend mode by using blendMode():
function draw() {
blendMode(ADD);
Use additive blending.
clear();
Call clear(), since the background is added and doesn’t cover what was previously drawn.
background(0);
The glowing effect of additive blending won’t work with a white (or very bright) background.
let dx = map(mouseX, 0, width, -0.2, 0.2);
let wind = createVector(dx, 0);
emitter.applyForce(wind);
emitter.run();
  for (let i = 0; i < 3; i++) {
    emitter.addParticle();
  }
Instead of adding just one particle per cycle, this example adds three to further layer the effect.
}
Additive blending and particle systems provide an opportunity to discuss renderers in computer graphics. A renderer is the part of the code that’s responsible for drawing on the screen. The p5.js library’s default renderer, which you’ve so far been using without realizing it, is built on top of the standard 2D drawing and animation renderer included in modern web browsers. However, an additional rendering option called WEBGL is available. WebGL, which stands for Web Graphics Library, is a browser-based high-performance renderer for both 2D and 3D graphics. It utilizes additional features available from your computer’s graphics card. To enable it, add a third argument to createCanvas():
function setup() {
createCanvas(640, 240, WEBGL);
Enable the WebGL renderer.
}
Typically, the WebGL renderer is necessary only if you’re drawing 3D shapes in your p5.js sketch. However, even for 2D sketches, the WebGL renderer can be useful in some cases—depending on your computer’s hardware and the specific details of your sketch, it can significantly improve drawing performance. A particle system (especially one with additive blending enabled) is exactly one of these scenarios where many more particles can be drawn without slowing the sketch in WEBGL mode. Keep in mind that WEBGL mode changes the origin point for drawing, making (0,0) the center of the canvas rather than the top-left corner. WEBGL mode also changes the way some functions behave, and it may alter the quality of the rendering. Additionally, some older devices or browsers don’t support WebGL, though such instances are rare. You can learn more in the WebGL videos at the Coding Train website.
Exercise 4.13
In Example 4.9, three particles are added with a for loop each time through draw() to create a more layered effect. A better solution would be to modify the addParticle() method to accept an argument—for example, addParticle(3), to determine the number of particles to add. Fill in the new method definition here. How might it default to one particle if no value is provided?
addParticle(amount = 1) {
for (let i = 0; i < amount; i++) {
this.particles.push(new Particle(this.origin.x, this.origin.y));
}
}
Exercise 4.14
Use tint() in combination with additive blending to create a rainbow effect. What happens if you try blending with other modes, such as SUBTRACT, LIGHTEST, DARKEST, DIFFERENCE, EXCLUSION, or MULTIPLY?
The Ecosystem Project
Take your creature from Chapter 3 and build a system of creatures. How do they interact with one another? Can you use inheritance and polymorphism to create a variety of creatures, derived from the same codebase? Develop a methodology for the way they compete for resources (for example, food). Can you track a creature’s health much like a particle’s life span, removing creatures when appropriate? What rules can you incorporate to control the way creatures are born into the system?
Also, you might consider using a particle system in the design of a creature. What happens if an emitter is tied to the creature’s position?

Ah, isn’t this main program so simple and lovely?